
Scott
-
Posts
30048 -
Joined
Content Type
Profiles
Forums
Store
Blogs
Events
Downloads
Supra Articles
Gallery
Everything posted by Scott
-
Just get a laser module from ebay. As said they are around £35 including P&P now. I have 4 PS3s now BTW you can get the whole deck for around £50. Whatever option you choose just make sure you get the right one. When you have them apart there are obvious differences (twin lasers etc).
-
We were actually welcoming the Op (the guy who started the thread)... but welcome to you too
-
1. The manufacturer just gave a fixed value of 10 and 12 thou. The standard limits are +/- 2 thou but after speaking to Dude he said to aim towards the higher end, giving more of a gap, rather than the lower end. A little more clearance is better than being tight. From that I took my limits to be 10-11 thou and 12-13 thou. I tried to hit the figures spot on and for the most part I managed it. Only one or 2 have drifted out. 2. I bought them all from Toyota yes. I don't know if universal ones can be purchased but I personally wouldn't take the risk. If I still worked in the Machine Shop I would have simply made my own or ground down the ones I have. If you are grinding down any shims make sure you grind the bucket side though. I'm pretty sure they will be case hardened and you dont want to get underneath that as the cam will wear down the shim if the hardening is lost. 3. The only reason I can think of the shim under buckets being a preference would be when running serious RPM. I could be completely wrong but I imagine there might be a slight worry of the shim flying out and causing damage. With serious RPM the clearance stroke of the cam might be slightly faster than the upstroke of the valve. This would possibly leave a gap that the shim could fly out between causing damage. Even if that theory is totally wrong if you can find out why people run shimless buckets I would guess it to be the same reasoning. At my level I personally wouldn't worry about it. HTH
-
Welcome mate
-
Coolio, they are cheap as chips so I'll just go ahead with the 1.25. I'll update the thread when I try it Cheers
-
Cheers steve. I'm thinking a sump plug for the job... can you think of any reason it would be a bad idea? Cheers
-
I need to plug up one of the oil feeds, just not sure what thread it is. I'm pretty sure its M12 but not sure if it's 1.5 or 1.25. Anyone know off the top of their head? Cheers
-
I wouldn't clock the mileage if I were you. It always raises suspicion even when totally innocent.
-
I don't have an auto bud but I would guess it would be similar to a clutch change. Gearbox is going to need to come off anyway.
-
I typed in "stall" and selected "For Sale" in the prefix. That way it only shows you "for sale" items rather than everything
-
http://www.mkivsupra.net/vbb/showthread.php?236079-Hi-Stall-3400-Torque-Converter See my sig for "how to find what you are looking for". I'm not doing anything special that you can't do yourself
-
The pink bit http://www.mkivsupra.net/vbb/showthread.php?252150-New-Boostlogic-Gearbox-amp-3800-High-Stall-More-£1000!!!
-
Cheers. 269 GSC Stage 1s I was wondering about that mate, I was thinking about a light dusting of oil but I'll get that stuff and do it right Then again.... £50 for DFL spray I'll see what stuff they use in the work, does any dry film lubricant do the trick?
-
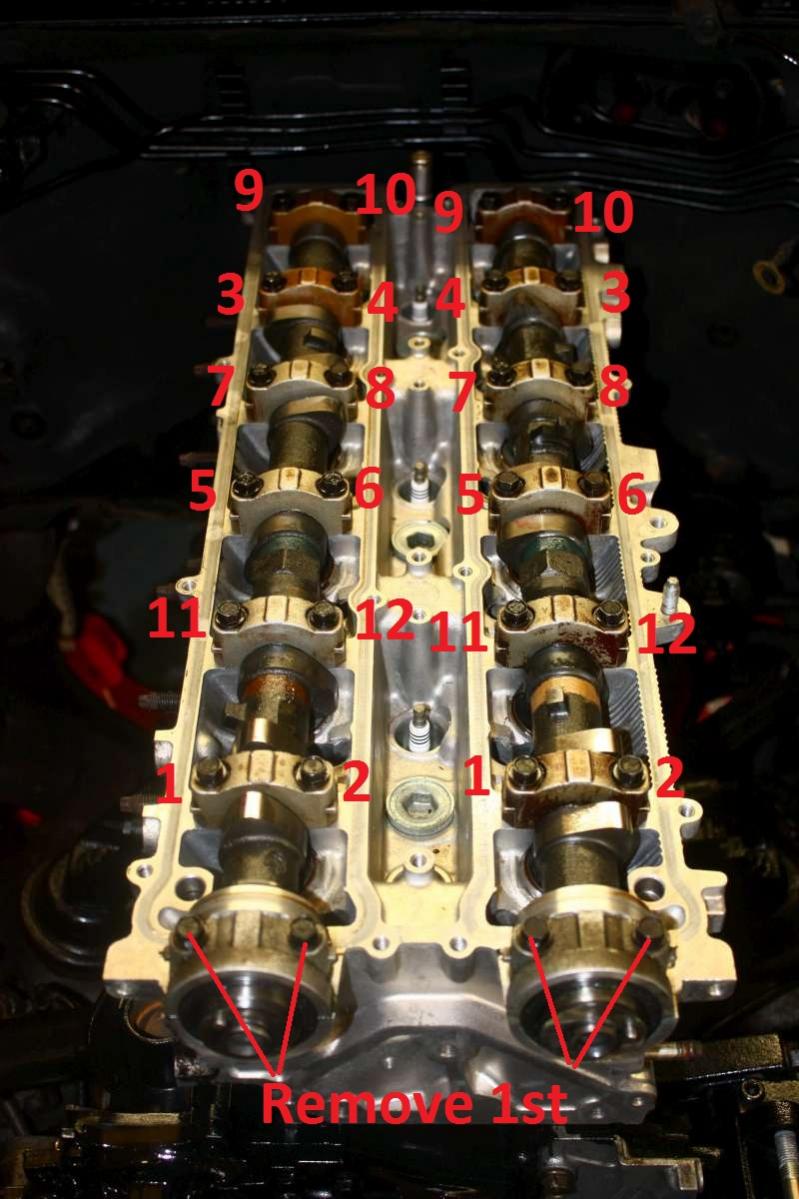
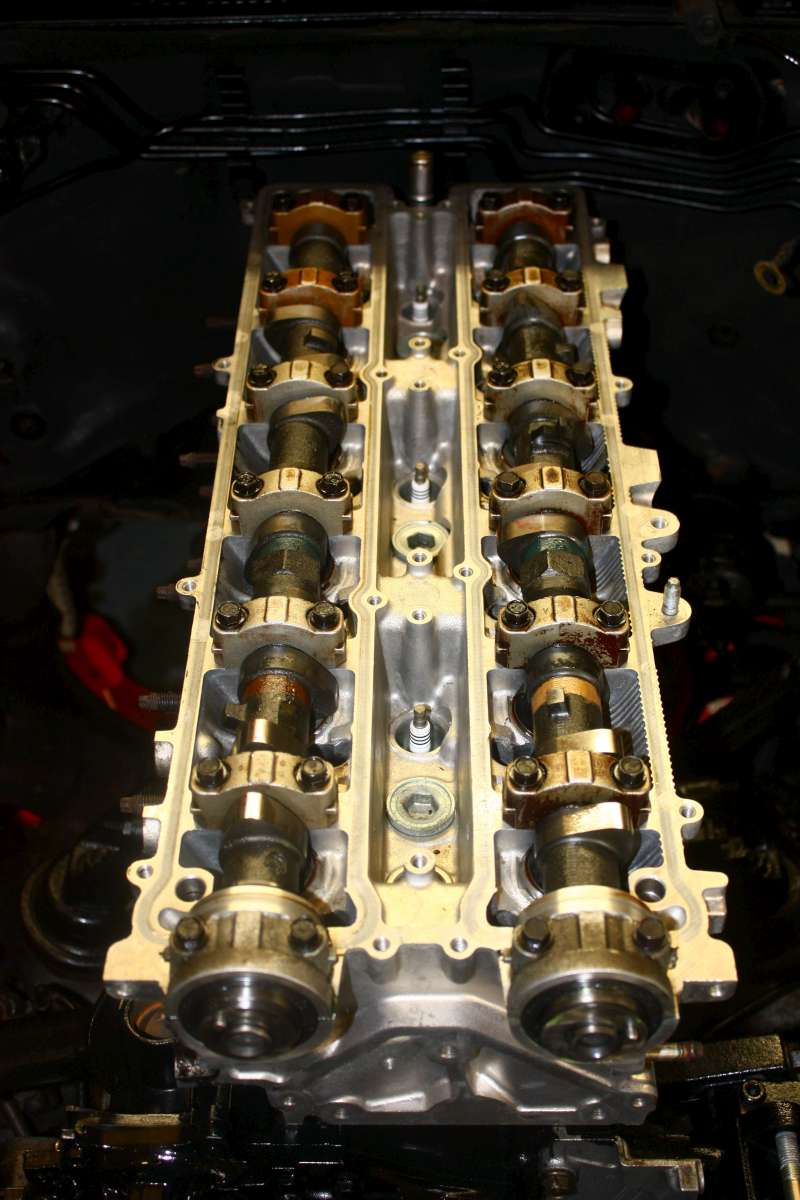
Once you have all the shims they need to be laid out into size, check them again with the micrometer then lay them out... From here, lay out each am individually from the piles so that they are ready to go. Be sure to check and double check here. Once you are completely happy simply place them into the corresponding buckets. Make sure that the buckets freely rotate in the bores, it should be really easy to rotate them. If it isn't, take them out and check them they may be corroded. If they are they need replaced and you may need to resize that shim. I then placed the cam in position and put some assembly lube on the journals. Once you are happy with everything it's time to start tightening it down. I followed the manual which for the TT you are told to put the no.3 and no.7 caps in place till they are touching the head. The cams also need to be rotated to the correct orientaton before tightening. On the Intake its around 3 o clock and on the exhaust it's around 11 o clock. I tightened them down to just above the head and then put the no.1 bearing in place. Put the cam seal in place (I recommend new). A light line of loctite is required round the outer edge of the bearings (see the manual) just to make a perfect seal. It's now time to follow the manual for the tightening proceedure. The order is as follows.. The same as with the loosening this needs to be done uniformly. One turn at a time on each bolt in the order above to get a uniform tightening. The bolts are torqued to 20nm (14lbs). I set my torque wrench at 10NM and did them all up to that (not at once, over numerous passes) and then did them all up to 20NM just to be sure it was uniform. And you're done. Now simply check the gaps with the feelers using the same method as described earlier. If you have done everything correctly it will be bang on
.jpg.a29f49e4fe4f77b6ae91f351c4246fc0.jpg)
-
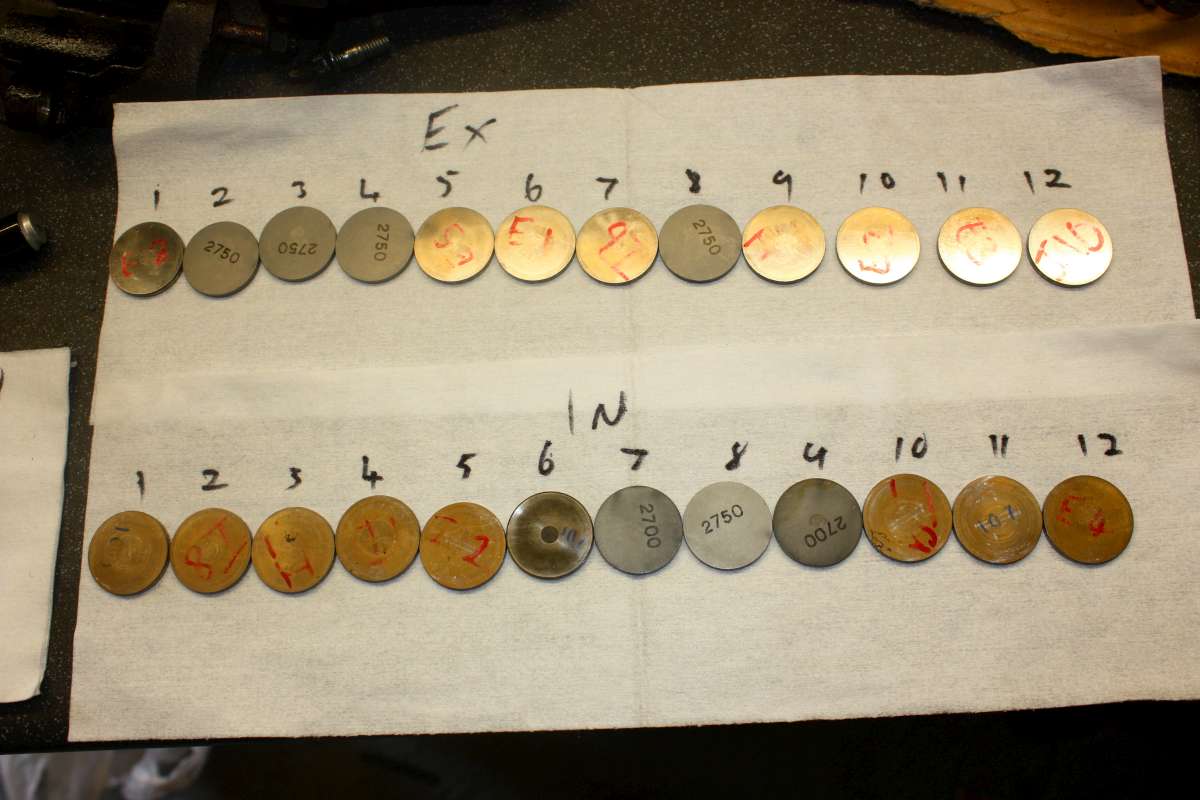
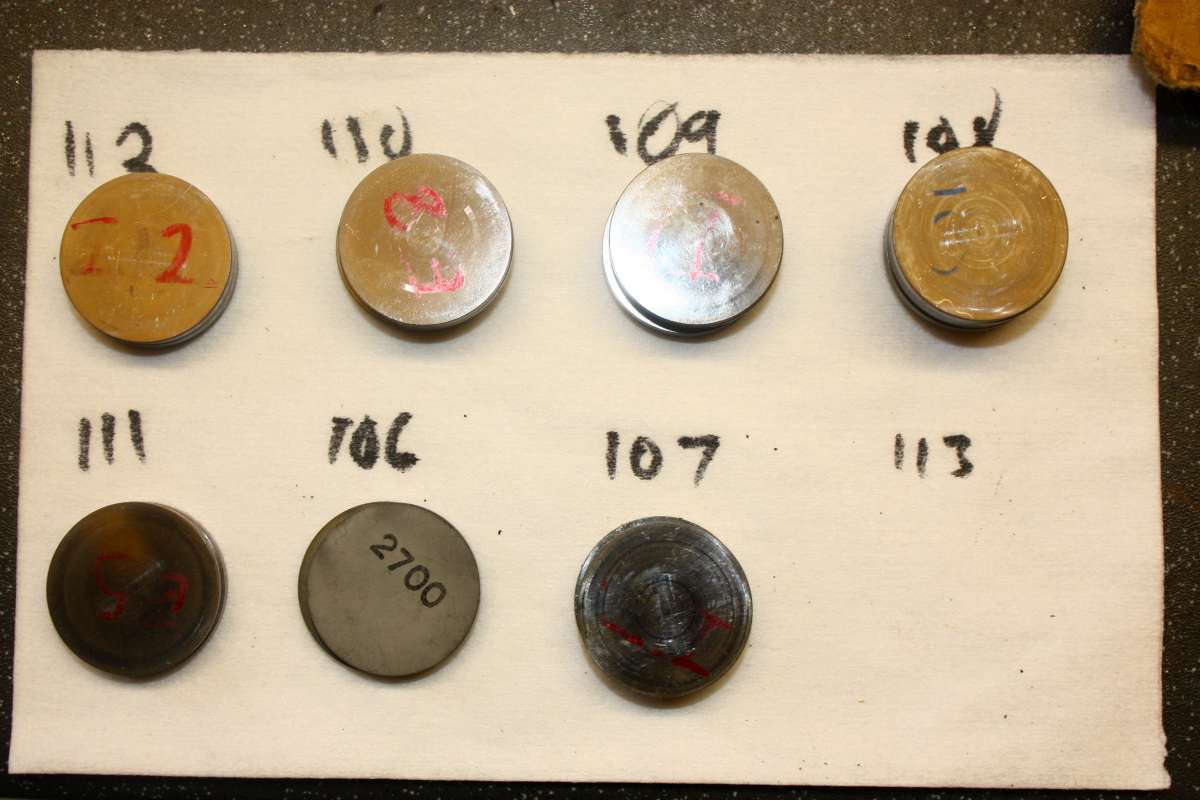
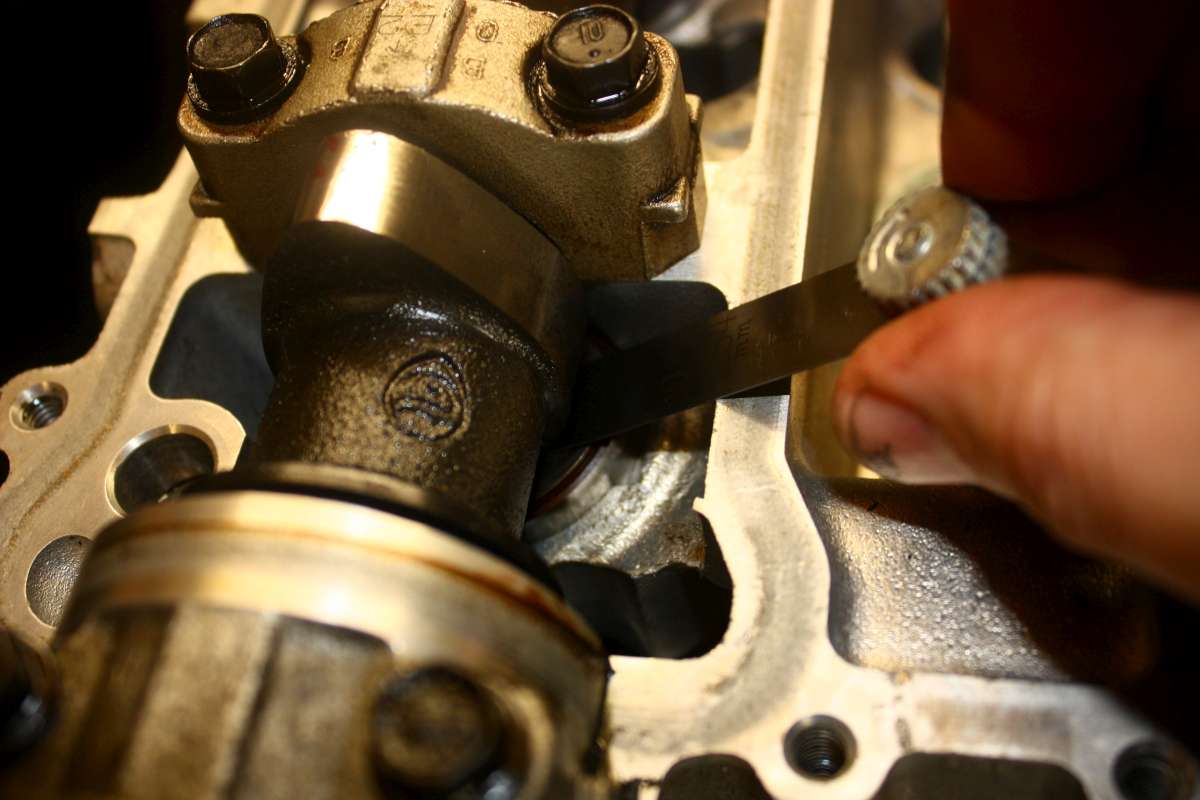
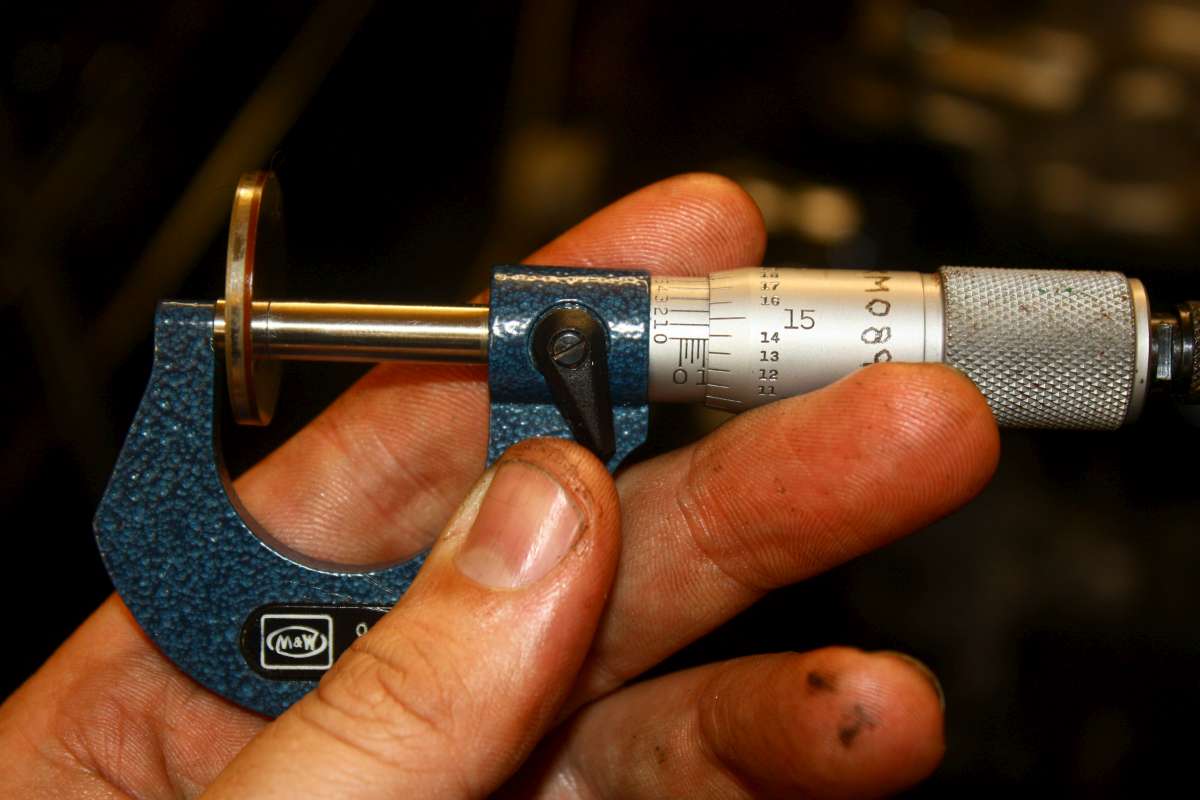
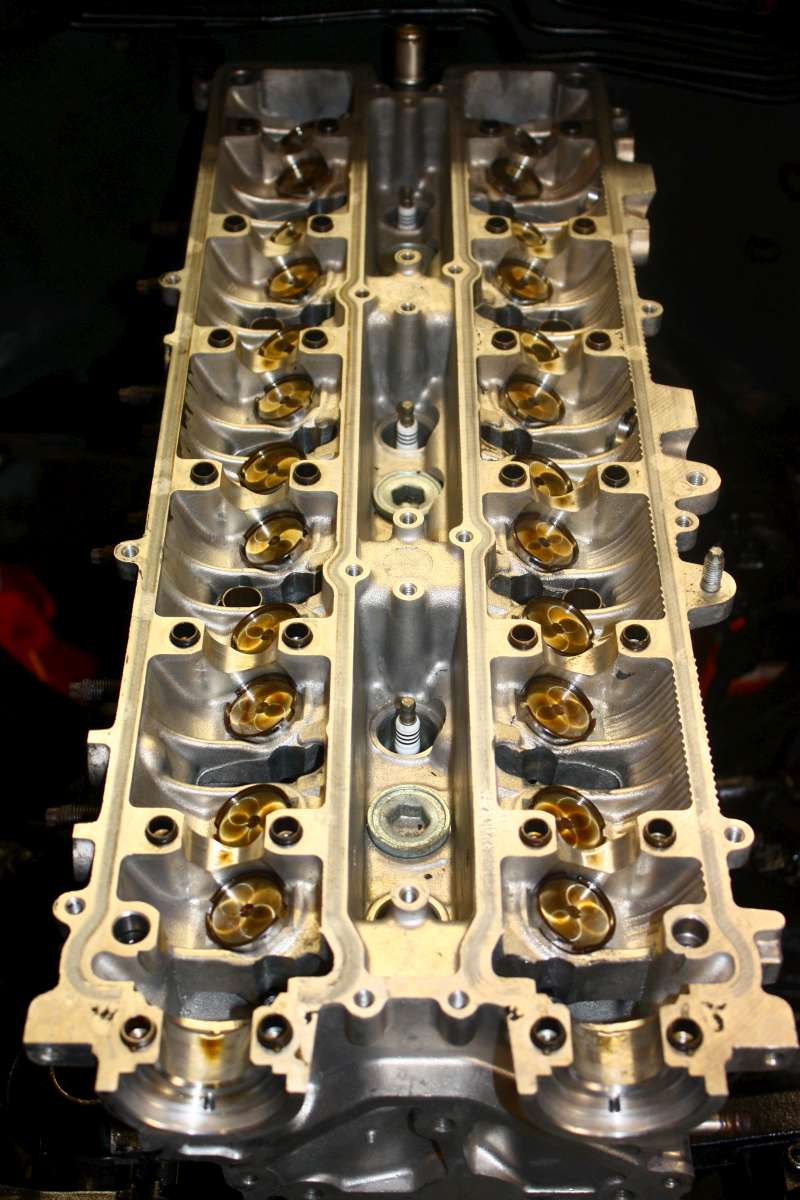
Due to fitting different cams I had to re-shim them. This guide should give an idea of what is involved and how to go about it. Tools/Consumables Required: 10mm Socket Ratchet for Socket Torque Wrench (20nm range) 30mm Spanner Small screwdriver 0-1" Micrometer (Or 0-25mm if you prefer metric) Imperial Feeler Gauges - A good range is required with individual feelers. I had 0.0015" then 0.002" to 0.025" individually. Assembly Lube (You can just use clean oil as per the manual if you wish) Loctite 5922 (Sealant for the front cam journal bearing) Wipes (I went through quite a few) Gloves (if you want to keep your hands oil free) Paper - To write sizes down on Pen - To write with Permenant Marker - To mark shims. Note1: This guide assumes you have half a clue what you are doing. I won't be turning it into a laymans guide for the safety of your engine. This is an engine critical job and must be done properly and carefully. Anyone attempting this must be competent with using a torque wrench, a micrometer and feeler gauges. Ham fisted use of any of the equipment could lead to a badly running engine or worse. Note2: Cleanliness is next to godliness when it comes to the insides of your engine. You must make sure that everything you use is as clean as possible. Dust won't be too much of a concern but certainly don't leave your engine open to the elements overnight or anything like that. If any larger debris gets into the head and you don't notice you will cause damage to your engine. I'm personally going to be doing an oil change after a few 100 miles just to clean out any dust and crap that may have gathered in the head/block/cooling system etc even though I have covered everything anytime I have been leaving it. I probably don't have to but I would rather be safe than sorry. I won't be covering removing the timing belt etc, this is already covered in a couple of the other guides so I didn't see any need to repeat it. This guide will begin with the timing belt off, the cam pulleys off and the cam covers off. So this is where we will be starting... The first thing you want to do is measure the current clearances. Firstly rotate the cam using the 30mm spanner so that cam lobes 1 & 2 are pointing upwards. If you look at the above picture you will see that 1 & 2 are pointing upwards on the intake side. Be careful not to damage the head while doing this, the cams will be very tight and quite jerky to turn. Using the feelers measure the gap between the shim and the underside of the cam. The following picture was measuring one of the exhaust side gaps but the principle is exactly the same. Work your way through the feelers till you find the one that fits the snuggest and write this size down along with the corresponding shim number. Do exactly the same for the 2nd shim gap and then rotate the cam so that lobes 3 & 4 are uppermost. The manual says to measure different ones at different locations at different rotation points on the cam, I found that doing it the above way saved lots of confusion and only added a few minutes of time to the job at hand. I had the following results... Intake1 0.009 Intake2 0.009 Intake3 0.007 Intake4 0.007 Intake5 0.008 Intake6 0.008 Intake7 0.008 Intake8 0.007 Intake9 0.008 Intake10 0.008 Intake11 0.006 Intake12 0.008 Then simply do the same on the Exhaust side. My results: Exhaust1 0.010 Exhaust2 0.011 Exhaust3 0.010 Exhaust4 0.010 Exhaust5 0.010 Exhaust6 0.011 Exhaust7 0.010 Exhaust8 0.010 Exhaust9 0.011 Exhaust10 0.011 Exhaust11 0.010 Exhaust12 0.010 The stock gaps are: Intake - 0.006" to 0.010" Exhaust - 0.010" to 0.014" According to the stock limits my cams are fine but most cam manufacturers will specify their own gap tolerances. In my case the limits were 0.010" intake and 0.012" exhaust. This meant that I needed to re-shim everything. Thankfully a little juggling helped out but we will get to that later. Ok, now that we know the current gaps the decision has to be made as to whether re-shimming is required. In my case it was so the cams had to come out. The front journal caps are removed first and entirely, no need to loosen them off in any order. Once the bolts are loosened the cap may need some leavering to get it off of the seal, I used a large taped up screwdriver resting on a small block of wood to do this. Thankfully there is a tab on the caps for doing just that. The rest of the caps are loosened uniformly and in an order. The following picture shows the order of loosening. Simply loosen each bolt 1 turn then move onto the next until the cam is free. Pay attention to this step here, if you don't do it properly you can quite easily snap your cam. Be patient and don't try to get ahead of yourself. Once the bearing caps are off gently remove the cams. The cam seals will be in place, I would recommend replacing these but it's up to yourself. Put the cams somewhere safe and dirt free. Leave the oil on them as that will make for a good lubricant when they are going back in. The following picture shows the exhaust cam out and the intake cam free. Now you need to remove shims from the buckets. Firstly you need to mark all the shims so that you know which one goes where. Simply give the tops of the shims a wipe and then mark either "I" or "E" followed by the valve number. The buckets are notched to give access to the shims with a small screwdriver. You need to be fairly gentle removing them as oil will be holding them in place. It can get a little tricky, for some I just pulled the bucket out to get it out. Always place the buckets back in the same location that they came from. I'm not sure on the tolerances of the buckets so I was always careful of what ones went where. Once all the shims are out you want to measure them using the micrometer. Mark the size of the shim next to the corresponding gap that you wrote down earlier... Intake1 0.009 - 0.1100 Intake2 0.009 - 0.1110 Intake3 0.007 - 0.1100 Intake4 0.007 - 0.1130 Intake5 0.008 - 0.1140 Intake6 0.008 - 0.1090 Intake7 0.008 - 0.1080 Intake8 0.007 - 0.1110 Intake9 0.008 - 0.1095 Intake10 0.008 - 0.1110 Intake11 0.006 - 0.1120 Intake12 0.008 - 0.1125 Exhaust1 0.010 - 0.1120 Exhaust2 0.011 - 0.1095 Exhaust3 0.010 - 0.1100 Exhaust4 0.010 - 0.1100 Exhaust5 0.010 - 0.1130 Exhaust6 0.011 - 0.1130 Exhaust7 0.010 - 0.1110 Exhaust8 0.010 - 0.1100 Exhaust9 0.011 - 0.1130 Exhaust10 0.011 - 0.1100 Exhaust11 0.010 - 0.1125 Exhaust12 0.010 - 0.1135 From the above you can work out the sizes of shim that you require. The most important thing to remember here is that in order to increase the gap you need to decrease the shim size. It's very easy to get confused and end up buying a larger shim when you actually require a smaller one. In this instance I need a 0.010" gap on the intake and a 0.012" gap on the exhaust Intake1 0.009 - 0.1100 - (-0.001) 0.109" required Intake2 0.009 - 0.1110 - (-0.001) 0.110" required Intake3 0.007 - 0.1100 - (-0.003) 0.107" required Intake4 0.007 - 0.1130 - (-0.003) 0.110" required Intake5 0.008 - 0.1140 - (-0.002) 0.112" required Intake6 0.008 - 0.1090 - (-0.002) 0.107" required Intake7 0.008 - 0.1080 - (-0.002) 0.106" required Intake8 0.007 - 0.1110 - (-0.003) 0.108" required Intake9 0.008 - 0.1095 - (-0.002) 0.1075" required Intake10 0.008 - 0.1110 - (-0.002) 0.109" required Intake11 0.006 - 0.1120 - (-0.004) 0.108" required Intake12 0.008 - 0.1125 - (-0.002) 0.1105" required Exhaust1 0.010 - 0.1120 - (-0.002) 0.110" required Exhaust2 0.011 - 0.1095 - (-0.001) 0.1085" required Exhaust3 0.010 - 0.1100 - (-0.002) 0.109" required Exhaust4 0.010 - 0.1100 - (-0.002) 0.108" required Exhaust5 0.010 - 0.1130 - (-0.002) 0.111" required Exhaust6 0.011 - 0.1130 - (-0.001) 0.112" required Exhaust7 0.010 - 0.1110 - (-0.002) 0.109" required Exhaust8 0.010 - 0.1100 - (-0.002) 0.108" required Exhaust9 0.011 - 0.1130 - (-0.001) 0.112" required Exhaust10 0.011 - 0.1100 - (-0.001) 0.109" required Exhaust11 0.010 - 0.1125 - (-0.002) 0.1105" required Exhaust12 0.010 - 0.1135 - (-0.002) 0.1115" required The shims come in 0.002" increments and I was told by Dude to always work to the larger tolerance so where an exact size can't be found you need to drop to the closest LOWER size. From the above you can see that the following is required... 0.106 1 0.107 3 0.108 5 0.109 5 0.110 5 0.111 2 0.112 3 Obviously we don't want to buy all new shims (they are £10 each) so we need to try and make the most of what we currently have, which are.... 108 1 109 3 110 6 111 4 112 4 113 5 114 1 When ordering shims they come in 0.002" increments. It was recommended to me by Dude that I work to the larger end of the limits so when a size isn't available, ie 0.107", the next size down is ordered, ie 0.106". Taking the above into account the following would need to be ordered (thankfully I had a spare head with more shims to make use of so I only needed a few)... 0.106 x 4 0.108 x 6 The shims of use that we currently have are: 0.108 x 1 0.109 x 3 0.110 x 5 0.111 x 2 0.112 x 3 TBC


-
Finally got my shims from Toyota today so I set about getting the cams fitted for good. Went reasonaby well, all in and done in an hour

-
I'm thinking that might be normal due to you having UK turbos. They are a little laggier so the gain probably needs to go higher. Don't worry about increasing the gain, as long as you don't overboost you will be fine
-
You can set it at 1.3 no bother and change the scramble button to 1.4. On a short burst you should see a bit of a difference Remapping the car will gain you a bit of power and a bit more middle end grunt (the mines ECU shows this) but for the money involved I would only get a stand alone ECU if you planned on going single later on. Ahh, you got it working then What was the issue?
-
With UK turbos you can set the boost to 1.4 if you like. Personally I wouldn't go past 1.3 on UKs as I can't see there being any gain due to increased heat.
-
Ahh is that what you meant, you confused me with the "roaming" part. However, how are you struggling to figure out a way to know if the data is turned off if you already know it?
-
I just found that out recently. I think there are 4 or 5 turbo gasket parts (2 or 3 rings plus a couple of metal gaskets) in the main gasket kit, but the rest is missing.
-
Good runners these. Even after revving the engine into oblivion they still run like clockwork. As H says, buy it with the intention of keeping it and it will be a bargain.
-

for sale Facelift Single Turbo (730 bhp) Big Spec Car
Scott replied to add heywood's topic in Supra Classifieds
Looks cracking mate. Turbo is hardly even working and producing good figures. Is it laggy at all? Any dyno plots? -
Like this.... http://1.2.3.9/bmi/www.rgarage.co.uk/Product_Images/small_touring_plus_knob.jpg
-
I was going to make one years ago but never got around to it. I had an idea similar to the Type-R gear knob. http://1.2.3.9/bmi/www.cartuningparts.co.uk/img/titaniumred-replacement-6-speed-gear-knob-for-honda-civic-type-r_591256_500.jpg Only a little bit longer and slightly smoother on the shape.


.jpg.a29f49e4fe4f77b6ae91f351c4246fc0.jpg)


