
herbiemercman
-
Posts
1018 -
Joined
Content Type
Profiles
Forums
Store
Blogs
Events
Downloads
Supra Articles
Gallery
Everything posted by herbiemercman
-
 Many thanks Swampy and tayr, the pics are just great, i have also just realised that when i "Waxoyl" i inject the door pillar, so i assume some of the liquid mist will have entered some of the steel sill. I will remove the fibre glass sills and see what is required. Herbie.
 -
Hi Guys, My car was fitted with fiberglass sills from when i bought it and i have never removed them. I am curiouse to know if the metal bodywork beneath them is just as standard? I am asking this as in the 23 years i have had the car i have "Waxoyled" inside all the body panels but never had access to the body work sills cavity. My concern is that this area may have started to corrode as it does have water drain holes at each end of the fiber glass sills, so the metal will be wet for a long time without any air flow to dry it off. Does anyone know what it is like under the fiberglass sills and if there is a vunerability for the metal inside to corrode.? Herbie. BEST.PIC.3.JPEG.jpg (871.0 KB)
-
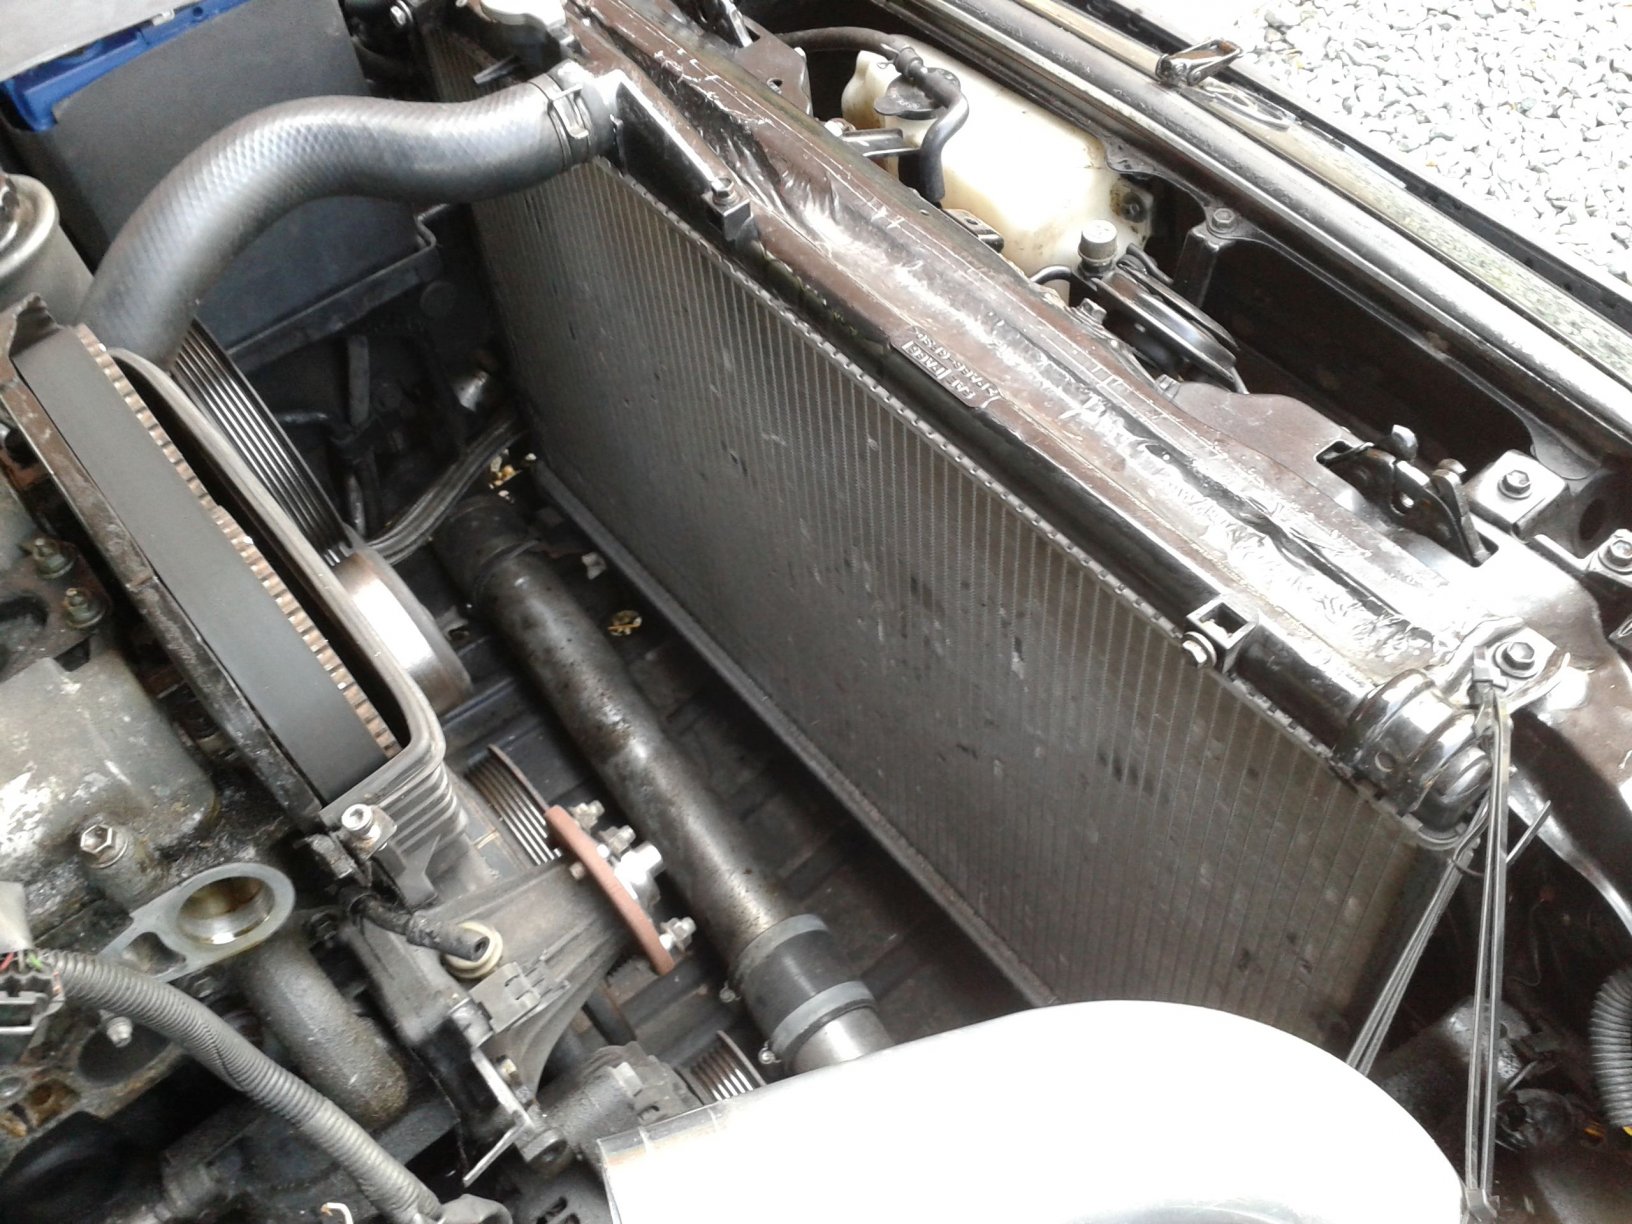
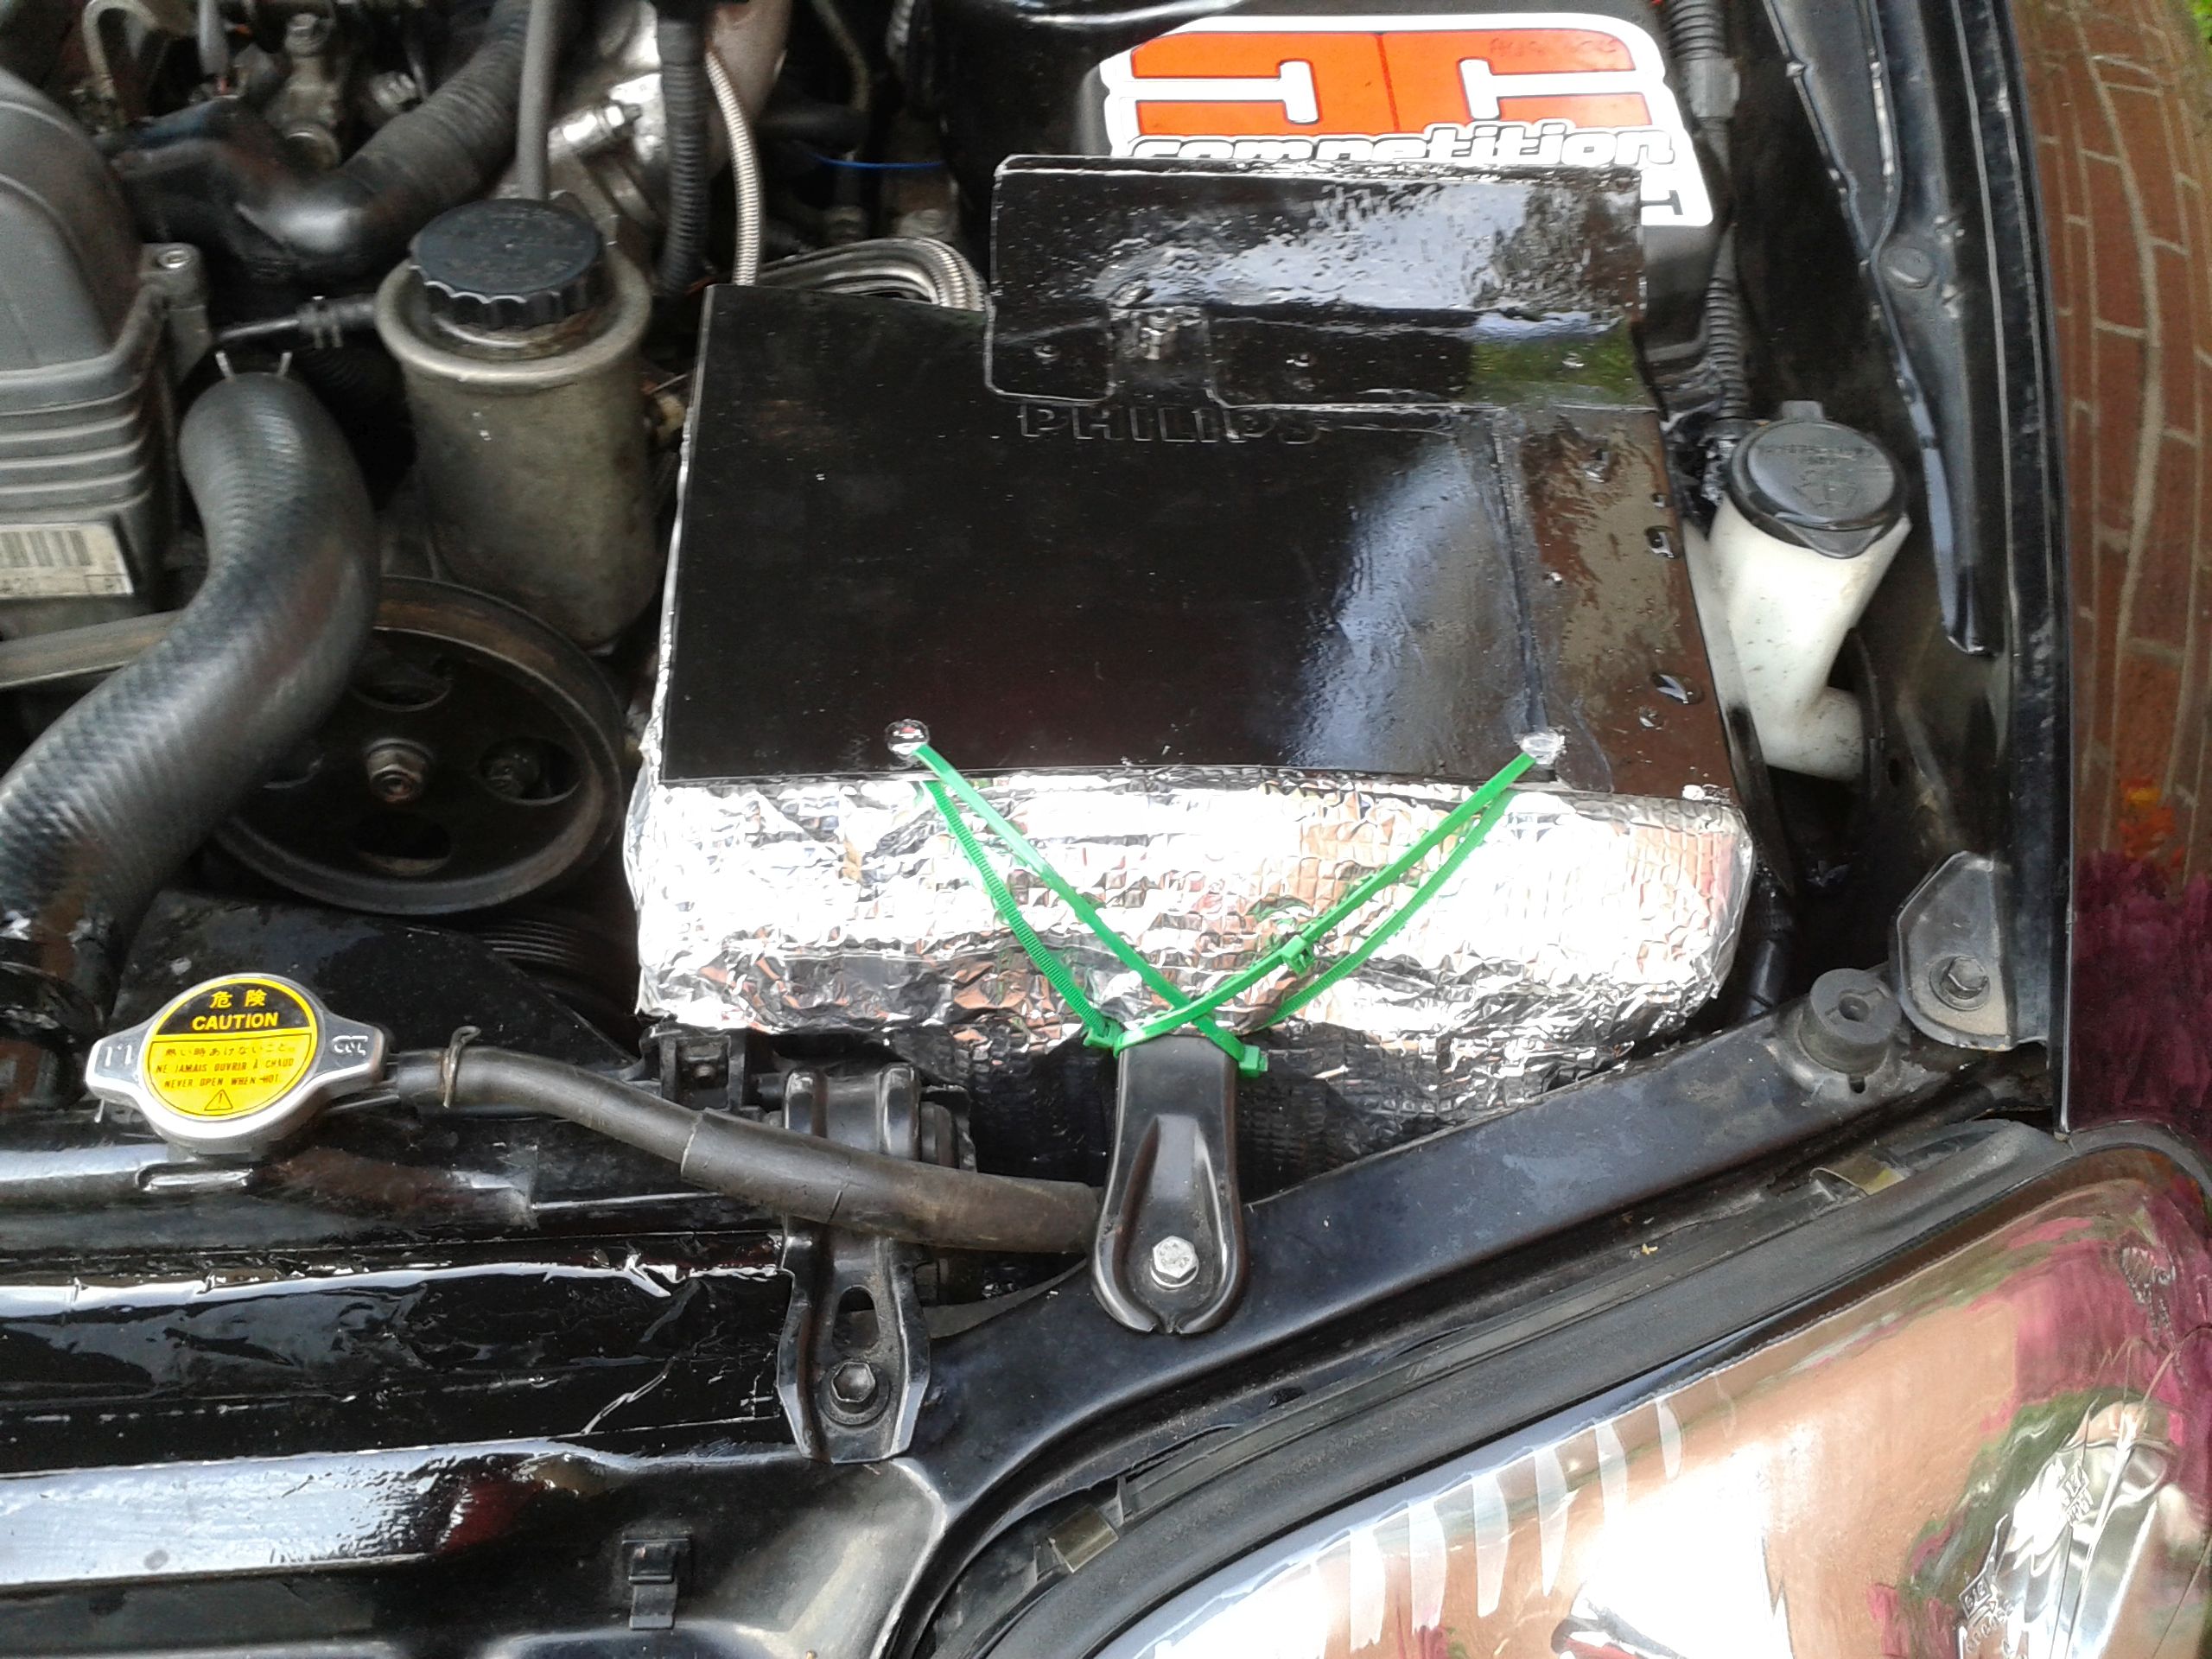
Hi Guys, Be interesting to see what other member's views are on this subject. The information i have gathered is as follows: VISCOUSE FAN. (A FEATHERING FAN). OEM FITTED. 1. They produce 35% more volume of cooling air when the expandable clutch locks on, circa 95 deg. C. 2. When not in use, (feathering), they use very little torque to drive them. 3. When not in use they have 20% less pressure drop to incomming cooling air against the electric fans. 4. They have very good longevity but weigh 50% more than an electric fan unit. 5. When the engine stops there is no thermostatic timed cooling. ELECTRIC THERMOSTATIC FANS. 1. These are fitted to most current cars as they are half the cost for the OEM's to fit. 2. They have the advantage of maintaining cooling air flow when the engine has stopped. 3. They only weigh half as much as a viscouse fan. 4. They make more space between the radiator and the front of the engine. 5. They have difficulties not working after long periods where the fan stat did not operate or the fan bearings were corroded and seized due to their exposed weather location on the vehicle. In some instances causing expensive overheating damage. MY EXPERIENCE OF WHY I INVESTIGATED THIS SITUATION: 1. Post my NAT conversion and the inherent increase of under bonnet temperatures, (exhaust and down pipe etc), i went through 3 batteries in 18 months, they were top quality Bosch. I researched the location of the battery and consequent "The life expectancy" of batteries "V" ambient temperature locations, i took some measurements and the NA readings which i took from my Grandson's NA were 30% higher on my NAT. 2. The down pipe, the turbo and the new exhaust manifold overheated the brake master cylinder unit and a warning light came on. 3. The engine starter relay, which has a built in thermal cut out stopped the engine from cranking. 4. The fiber noise attenuating material was melting on the bulk head. NB: All the items listed have now been baffeld with aluminum and ceramic board insulation, there are also air vents in the bonnet above the items which overheated. MY CONCLUSION: 1. The OEM cooling fans are the best. 2. Baffling items that overheat is the most simple way to protect them as well as allowing air movement out of the bonnet above them. 3. I cannot see any advantages in the electric fan units. 4. Time reveals the overheat problems due to fatigue, so you think all is ok until the component fails. I had no issues for the first 18 months after the NAT Conversion. So. what do you think? Herbie. 20190812_172014.jpg (684.1 KB) 20190812_172022.jpg (698.9 KB) 20190812_172030.jpg (655.3 KB)


-
for sale Cyl.hd.gasket. New. Mk4. Na. 2jz-ge. Engine.
herbiemercman replied to herbiemercman's topic in Parts for Sale
Hi Guys, I will put this item on ebay now, i just thought i would see if a member wanted one first. I also realize that you only purchase an item like this when you have a problem and i hope you do not as changing the head gasket is a long winded technical difficult job. Herbie. -
Hi Guys, I will put this item on ebay, just thought i would offer it to the Club first. I also realize that you only buy something like this when you need one, i hope you do not, they are located in an almost unacesable place below the air intake manifold assembly. Herbie.
-
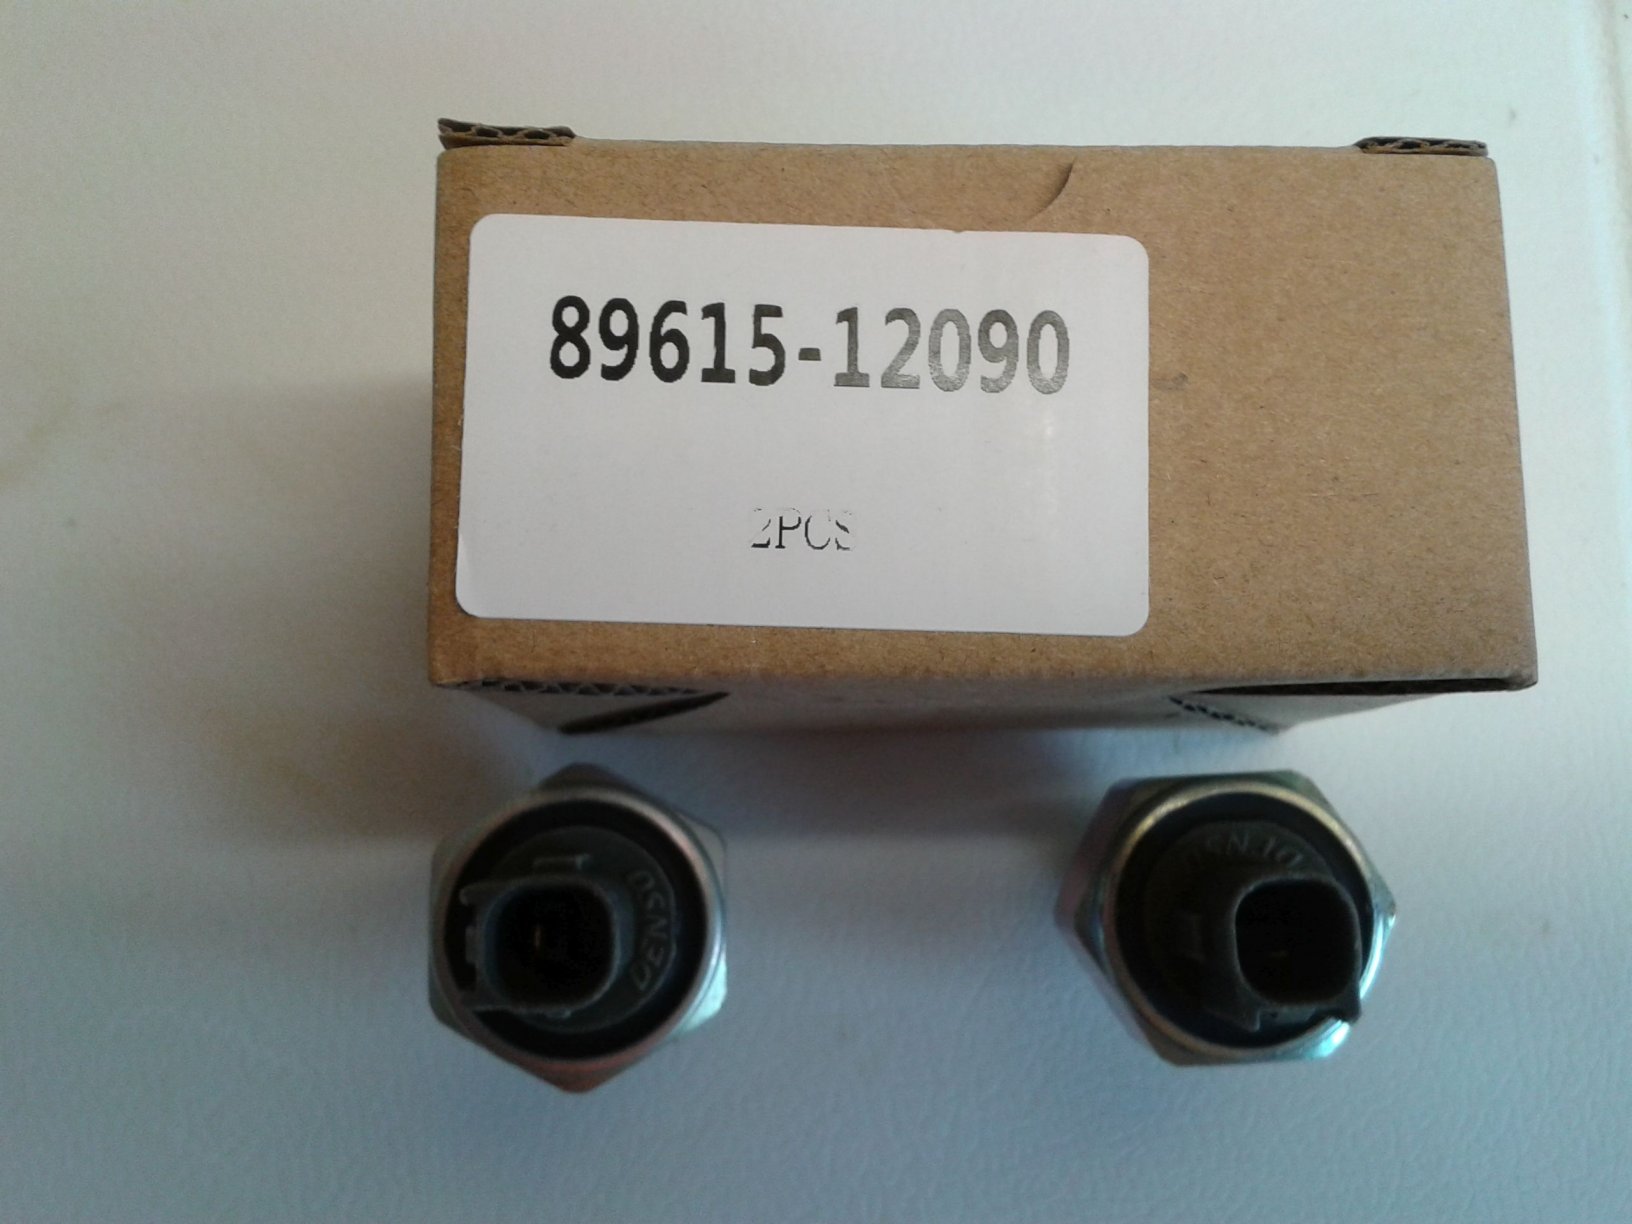
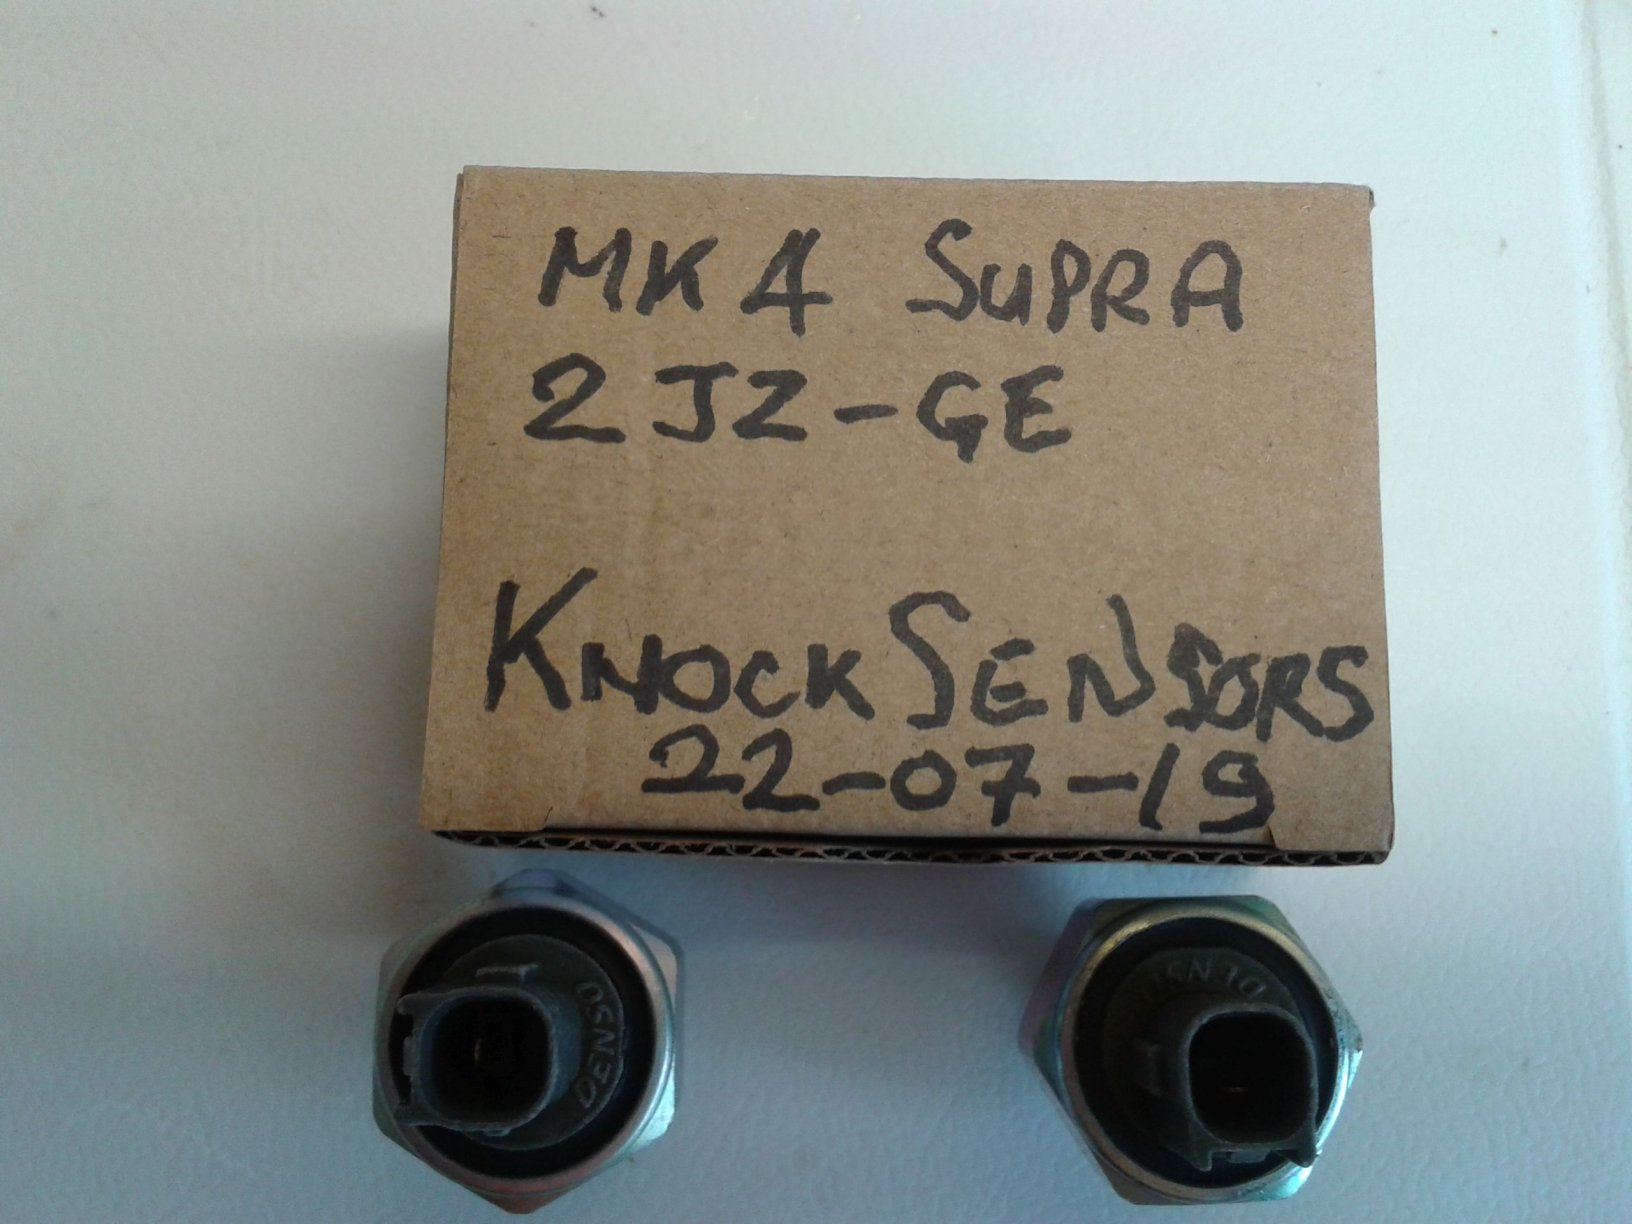
Hi Guys, I have two new "Denso" knock sensors for the 2 JZ-GE. NA, or NAT engines.Part No: 89615 - 12090. £35 for the pair, P&P £3.20. For the uninitiated like i was prior to my investigation into what these components are, there are two of the sensors one looking after the front three cylinders and the second one looking after the rear three cylinders, they send important information to the ECU on ignition timing, fueling and pinking etc. If either one of the sensors is not functioning correctly then this can cause reduced performance, a reduction in MPG,poor starting etc. So important components. Herbie. 20190803_094850.jpg (329.8 KB) 20190803_094901.jpg (370.2 KB)
-
for sale Cyl.hd.gasket. New. Mk4. Na. 2jz-ge. Engine.
herbiemercman posted a topic in Parts for Sale
Hi Guys, I have a new cylinder head gasket for the 1994 to 1997, 2JZ-GE. engine. NA or NAT. It is the OEM spec with improved steel laminate construction for better longevity. The compression ration is also maintained. £35. and P&P £3.25. Herbie. -
Cooling syst. Water expansion tank. ?
herbiemercman replied to herbiemercman's topic in mkiv Technical
Thanks Scooter & Dunk & PJJ, Yes that covers basically what i have done i am confident it will be ok. I just got a bit paranoid following the initial hall marks of the failed gasket, loss of water and heavy pluming. A head gasket failure is a real expensive "balls ache" and i am an HND Engineer and cannot stand oil leaks, water leaks, things that do not work etc. Herbie. -
Hi Guys, The white plastic expansion tank in front of the radiator, as most of you must know it has a low and high mark moulded into the LHS of the tank. There are two rubber pipes one positioned towards the bottom of the tank and the other short pipe bends down 2 inches outside the tank, this is obviously to run off excessive coolant for owners who have over filled the tank, the inside pipe must take the coolant from expansion volume as the engine heats up, and also provide feed back coolant to the system where it is required? For the 22 years i have owned the car from new the red coolant, (OEM for life) has always sat at the lower mark when the engine is cold and at the upper mark when the engine is hot, i assume this is the normal function? When my cylinder head gasket failed in recent months on cylinder no1 was the first time i experienced the loss of coolant and i badly pluming exhaust, i also carried out a test on the coolant and it clearly showed combustion products in the coolant, i was sure it was a failed gasket. Following the new gasket replacement i filled the cooling system and bled the top hose to the heater on the bulk head, the expansion tank was filled to the very top, i have covered some 40 miles at moderate speeds car running perfectly, the cooling liquid has now settled at the lower mark on the tank with the engine cold, am i right in assuming that the air bubbles etc have expelled and the system has returned to the normal operation? Herbie.
-
Head gasket replacement complete - engine will not start. ?
herbiemercman replied to herbiemercman's topic in mkiv Technical
Hi Style, If the technician who mapped my car had some reference numbers? and as i said previously i have no way of contacting him in Cardiff, ("Rocket Dog Racing"), then how would a more local mapper know what the details or the numbers of my MAP are? If i obtain an Air/Fuel gauge, like Mike suggested, do they just read out numbers? or do they show the units of pressure etc. Herbie. -
Head gasket replacement complete - engine will not start. ?
herbiemercman replied to herbiemercman's topic in mkiv Technical
Hi Style, Thank you for your comments re the plug in connectors being disconnected post your NAT conversion, i guess they were made redundant due to the MAP? With reference to the Air/Fuel gauge, no i do not have one, are you saying that this gauge will display information that will tell me that the "Fuel MAP software" in the MAP itself is keeping within the correct parameters? Final question if my car is performing as near as i can remember to how it performed prior to the new thicker head gasket being fitted, then why would i need a re-MAP.? Herbie. -
Head gasket replacement complete - engine will not start. ?
herbiemercman replied to herbiemercman's topic in mkiv Technical
Hi Everyone, The car started today after moving the distributer drive cog 2 notches and then moving the adjustment slot on the ali diecast body to the white 'tipex' mark we applied to the securing nut. We had not fitted the exhaust system to the downpipe but it was easy for us to see that she was running spot on. My friend who is a good mobile Mechanic had researched what he did and there was nothing in the OEM Toyota manual outlining the importance of the possible movement of the distributer drive cog when you have had the camshafts removed. My Mechanic ran a wire in the diagnostics socket from two pin holes, then moved the engine to TDC, prior to adjusting the distrbuter drive cog. We had spent 3 hrs in the pouring rain the previouse day , checking the continuity of the replacement knock sensors, double checking the valve timing, checking the compression, checking the fuel supply, observing the quality of the ht spark at the spark plugs, checking the HT leads were attached to the appropriate cylinders etc. We put the bonnet down and walked away pissed wet through, totally frustrated. The issue with an NAT, and not being able to contact the guy who carried out the conversion in Cardiff, is that you cannot find out why 3 or 4 sensor plugs are not connected and three 6mm rubber pressure pipes are cut off and in one case just a 6mm set screw blocking off one end, i still do not know why? however the car is running perfectly and has the same power, i was 'over the moon' after such a 'walk in the fog' operation. My Mechanic said it was the most complicated stressfull jobs he had carried out, i agree as i have messed with lots of engines,changing valves on a Porsche 911, and changing the piston liners in a boat etc. The overall cost was circa 500 pounds for parts and with my Mechanic being a good friend 500 pounds labour, six days work. I also want to thank the Members of this Club who were very helpfull, as well as Nick my local Mercedes man who gave advise and lent us essential special tools, also i would say the experience my Mechanic gained and myself means we could carry out the job again in half the time and with minimal frustration. Herbie. -
Head gasket replacement complete - engine will not start. ?
herbiemercman replied to herbiemercman's topic in mkiv Technical
Hi Mike, Many thanks for the info, my compression readings were all 178psi to 182 psi. The robust gasket has four steel laminates and from "Conceptua" Tuning, i miked up the thickness and it was 1.4 mm. This is meant to give longer life for a NAT and allows for your head to be skimmed 0.1 mm. Hope i do not need the remap, the guy in Cardiff who carried out the "Rocket Dog Racing" mapping for their conversions was fantastic, the performance was superb, you will know that good re-map guys are rare. Herbie. -
Head gasket replacement complete - engine will not start. ?
herbiemercman replied to herbiemercman's topic in mkiv Technical
Hi Mike2JZ, Thank you for the information, i have been studying the functional characteristics today and my money is on what you said about the ignition timing, it is also good to know that the engine should start without the exhaust connected to the down pipe. With reference to the VE (Volumetric efficiensy), the gasket supplier claims it has a negligeable effect on the compression ratio, sort of 9.8 to 1 instead of 10 to 1. also i was lead to believe that a slight reduction is ok for a turbo as the combustion temps reduce? Can you tell me what the firing order is and what the compression pressure range is? Also Chris Wilson who i have met twice,(great guy), sorted a deep rooted problem on my brother's twin turbo Supra, Chris has pointed out to another member with a starting problem the importance of the ECU grounding connections, he sent a photograph and it shows two 8 mm diam cables with large connection tags connected to the base of the air intake manifold, all i have is one 10 amp single wire connected in the same location with a 6mm amp tag, do you know why this is? as my car did run fine prior to the recent cylinder head replacement. Hi tintinmt, We numbered all the tops of the spark plug leads, also the length of the leads is a good guide. Thank you both once more, this club is a must for members who attempt complex jobs on their cars. Herbie. -
Head gasket replacement complete - engine will not start. ?
herbiemercman replied to herbiemercman's topic in mkiv Technical
Hi Style, How is it possible to put the dizzy 180 deg out? my mechanic who helped me with the job refitted the dizzy and he marked the slotted pinch bolt with white 'tipex', he said it was returned exactly as it was? Where would the MAP sensor be located on the intake side? also what does it look like? does it have rubber pressure pipes or wiring? With reference to the thicker gasket, these are widely used and the supplier said the compression would only reduce by 5%? he said a re-MAP was not in the question? I am grateful for your reply but still confused. Herbie. -
Hi Guys, Worst case scanairio, everything has been replaced exactly as prior to the job, photographs and parts marked etc, but she will not start, plugs wet with fuel and good spark, but does not even kick. So what are the potential failure modes? 1. We replaced the rear engine knock sensor, no red warning lights on dash.? If the new sensor is not the right one could this cause the problem? 2. The head gasket is 3 times thicker than the original.? 3. The TDC mark on the bottom crank pulley was spot on and so were the camshaft drive sprockets, checked it twice. 4. The compression on all cylinders was spot on. 5. The spark plugs are soacked in fuel and there is a good spark. 6. The distributer location pinch bolt was well marked. 7. There is a 3 ft length of 6mm ID rubber pipe that the NAT converter pushed a set screw into one end to block it off, but we do not know where the open end connects to? 8. We have not connected the end of the down pipe to the exhaust system, could this compromise the MAP.? What i cannot understand is why when we have fuel being injected and a good spark will it not run? could it be flooded? I removed the front two plugs and burned off the the fuel, but it still would not fire on these cylinders? Tomorrow i will connect the exhaust system as i know the pressure drop through the intake right through to the tail pipe affects the MAP, i will also check the knock sensor connection is good, and check where the 3 ft rubber pipe connects, i do not understand why the NAT expert would block one end of this pipe and connect the other end? I am not a happy bunny, just spent 3 hrs in the rain trying to solve this, any advise will be much appreciated. Herbie.
-
Cylinder head gasket replacement - difficult job.
herbiemercman replied to herbiemercman's topic in mkiv Technical
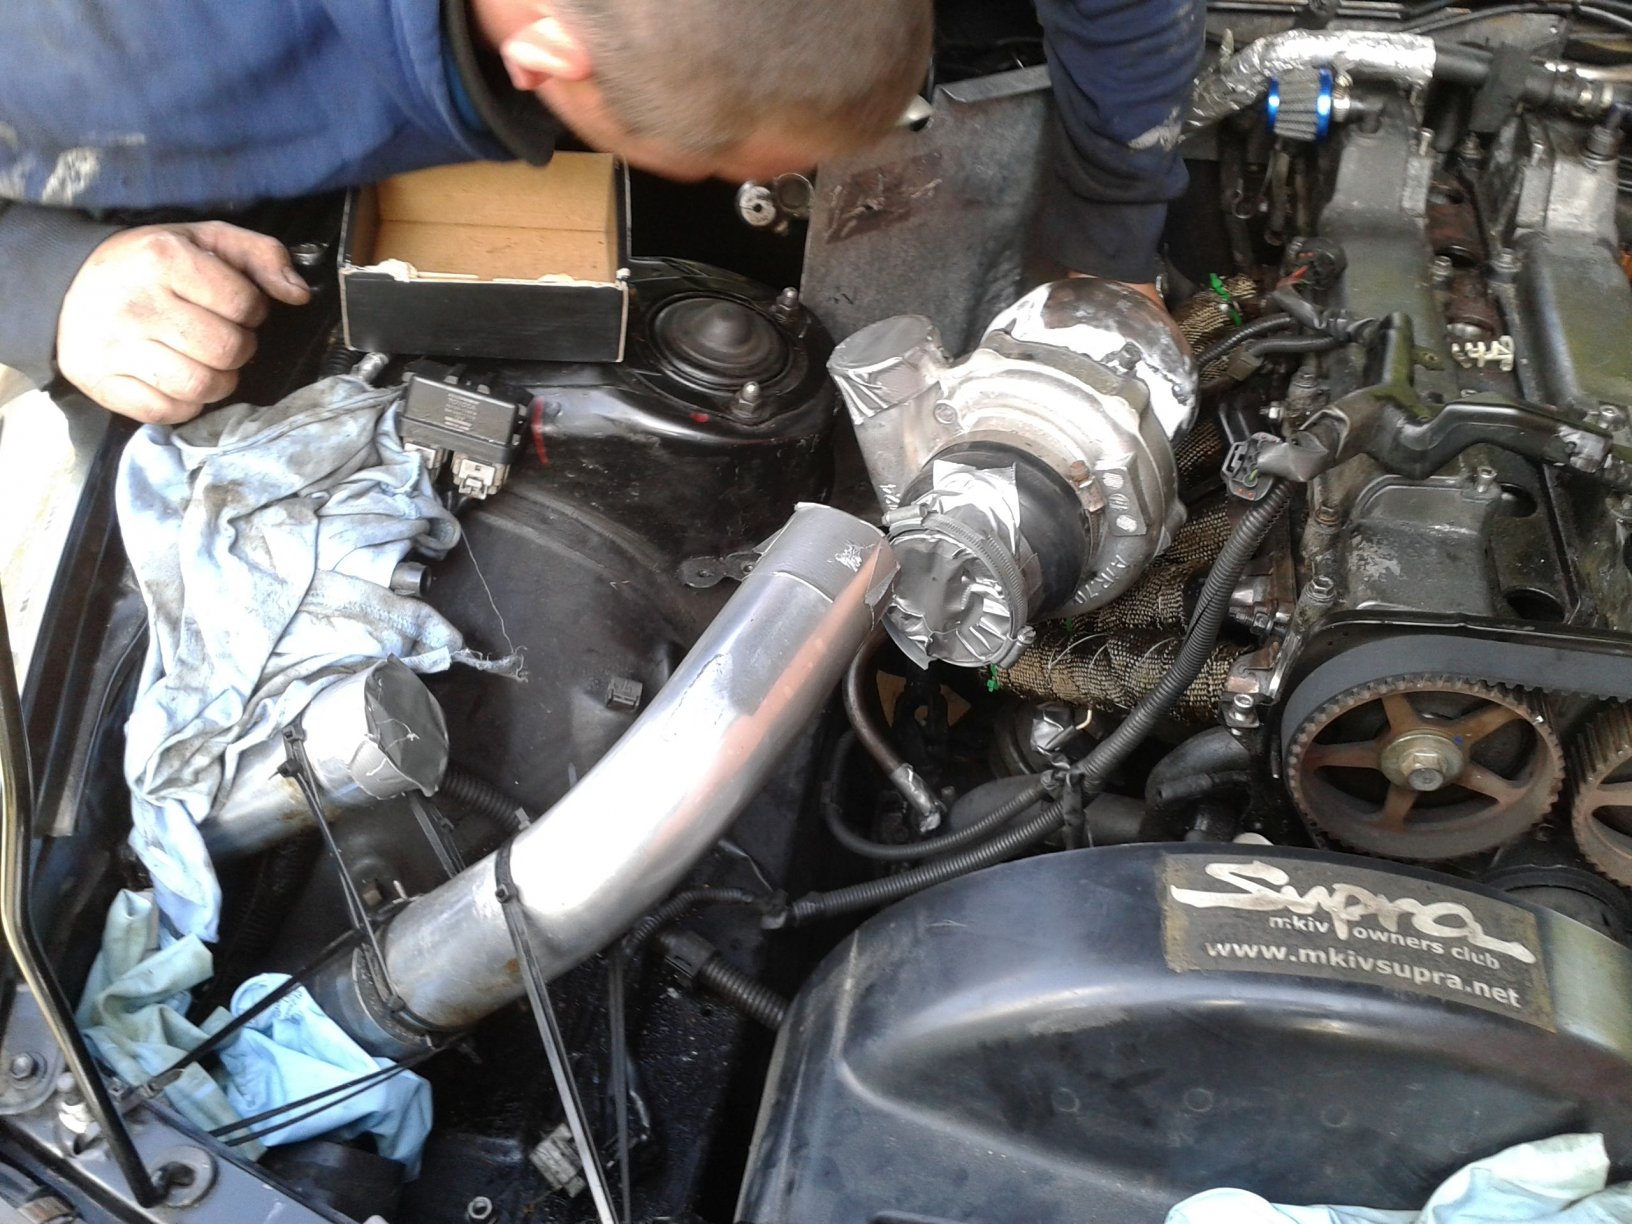
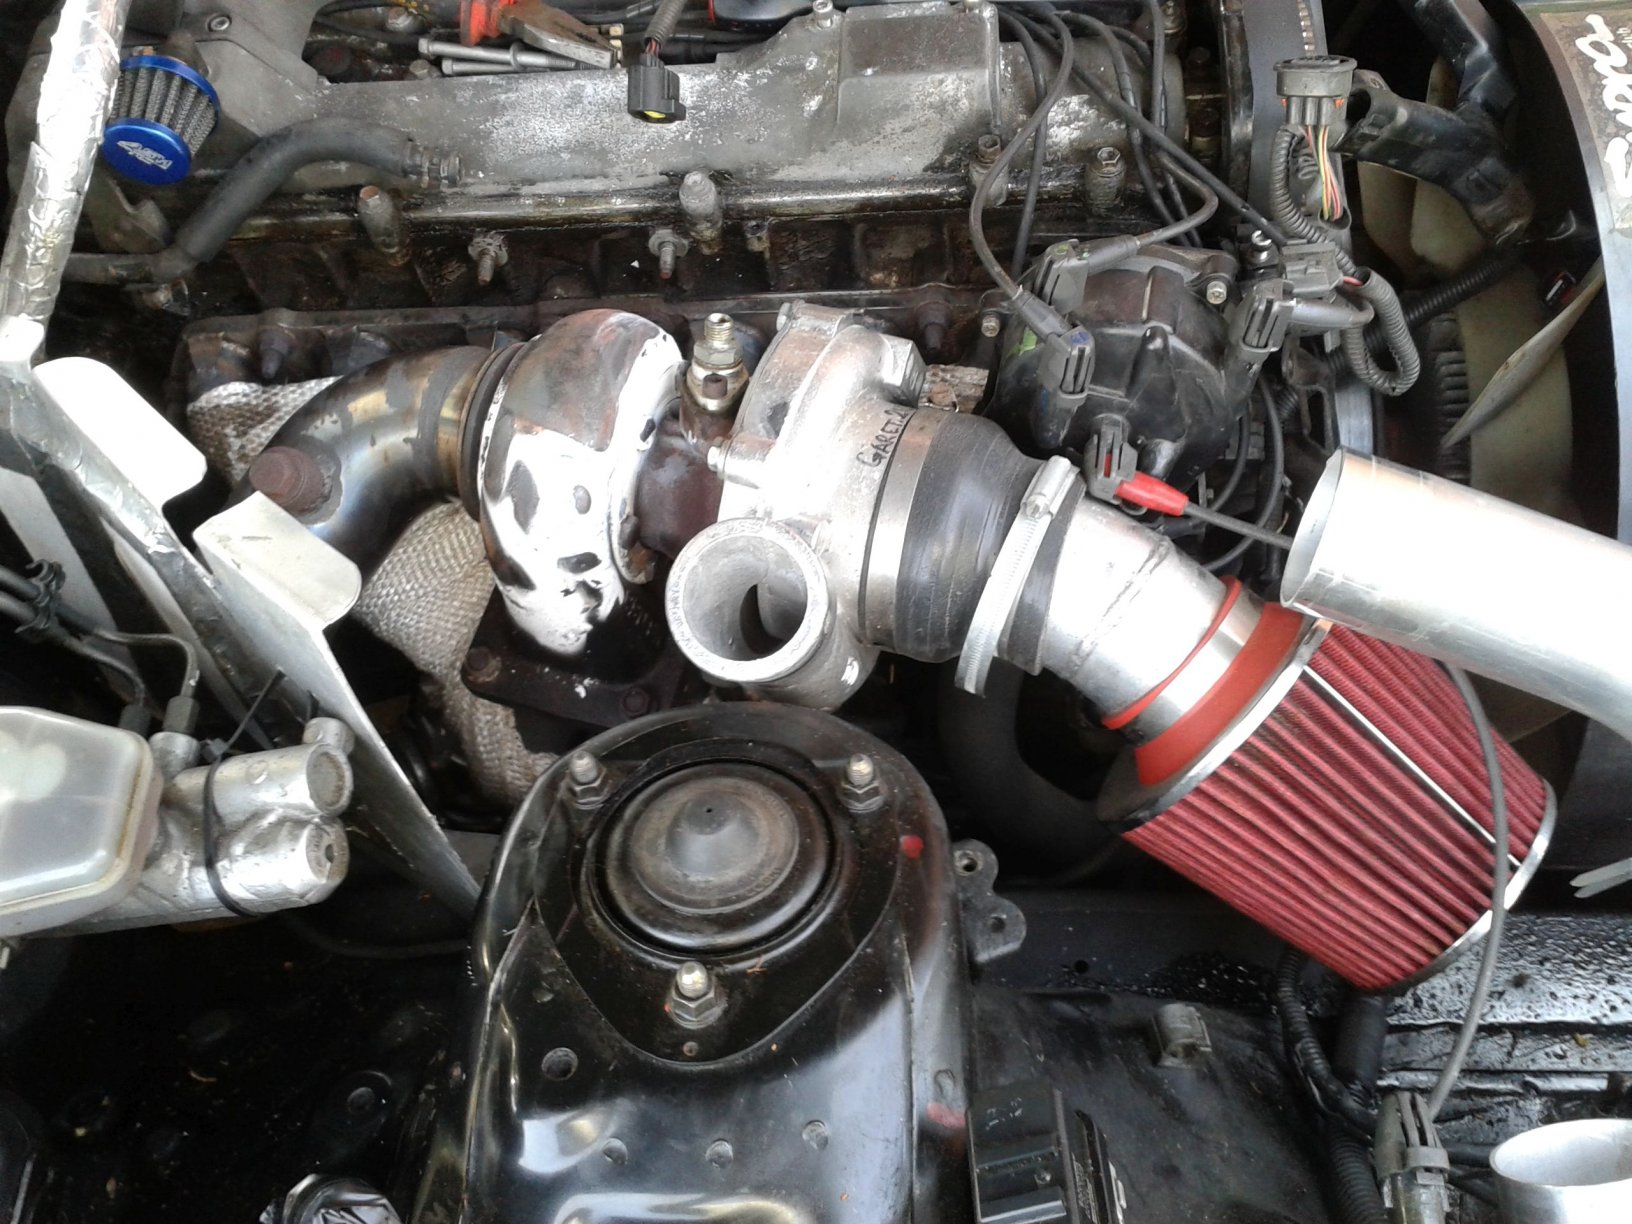
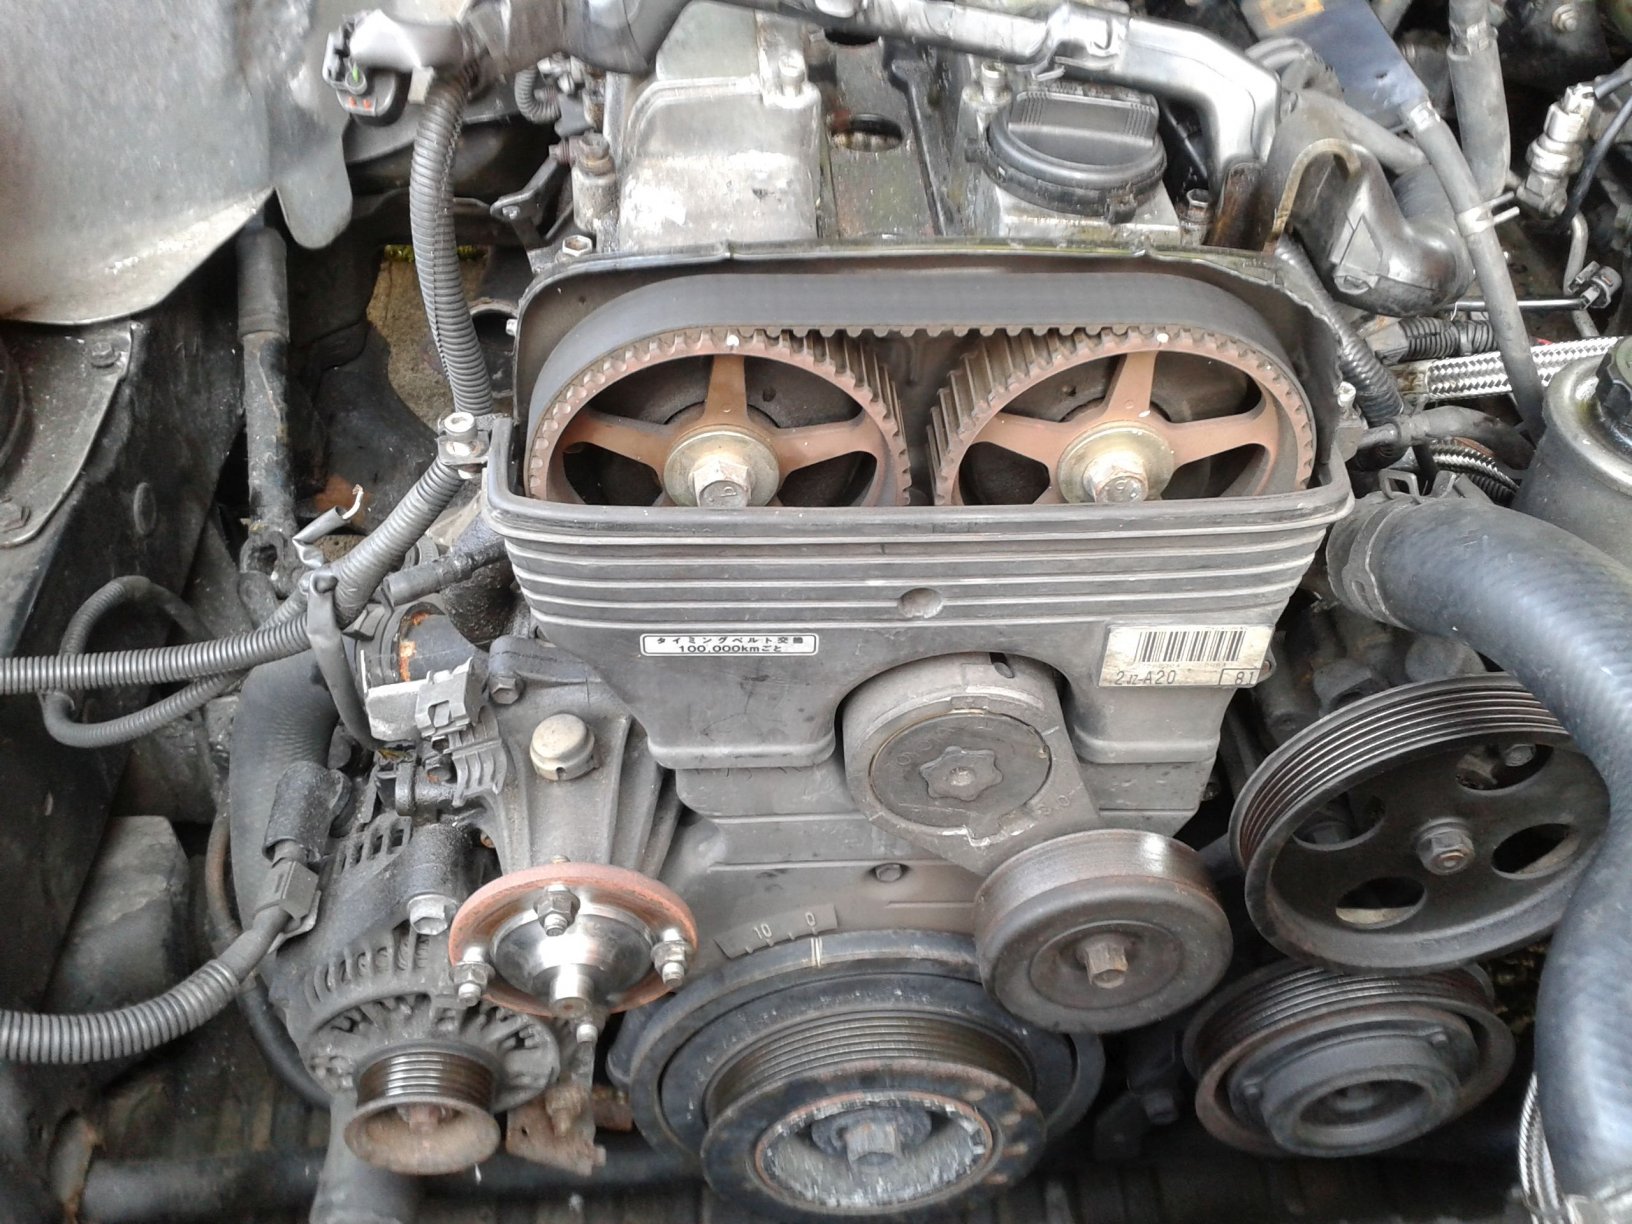
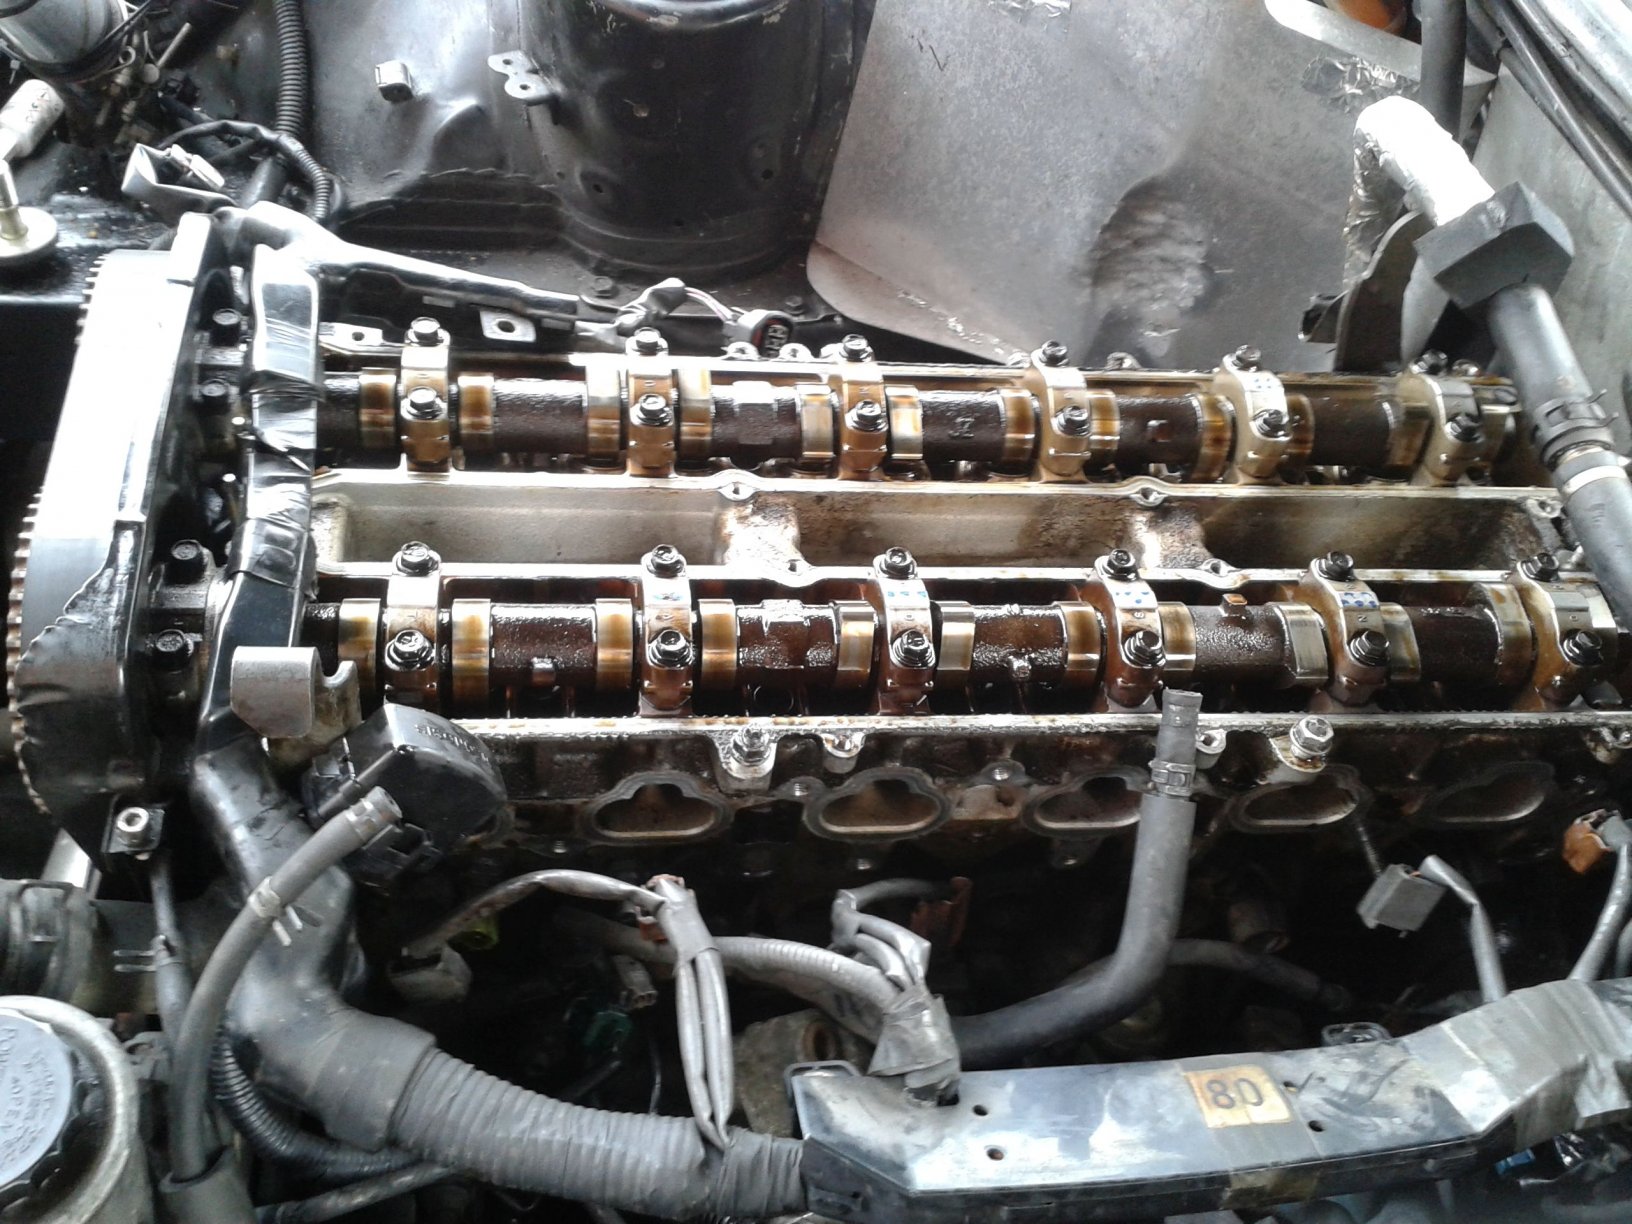
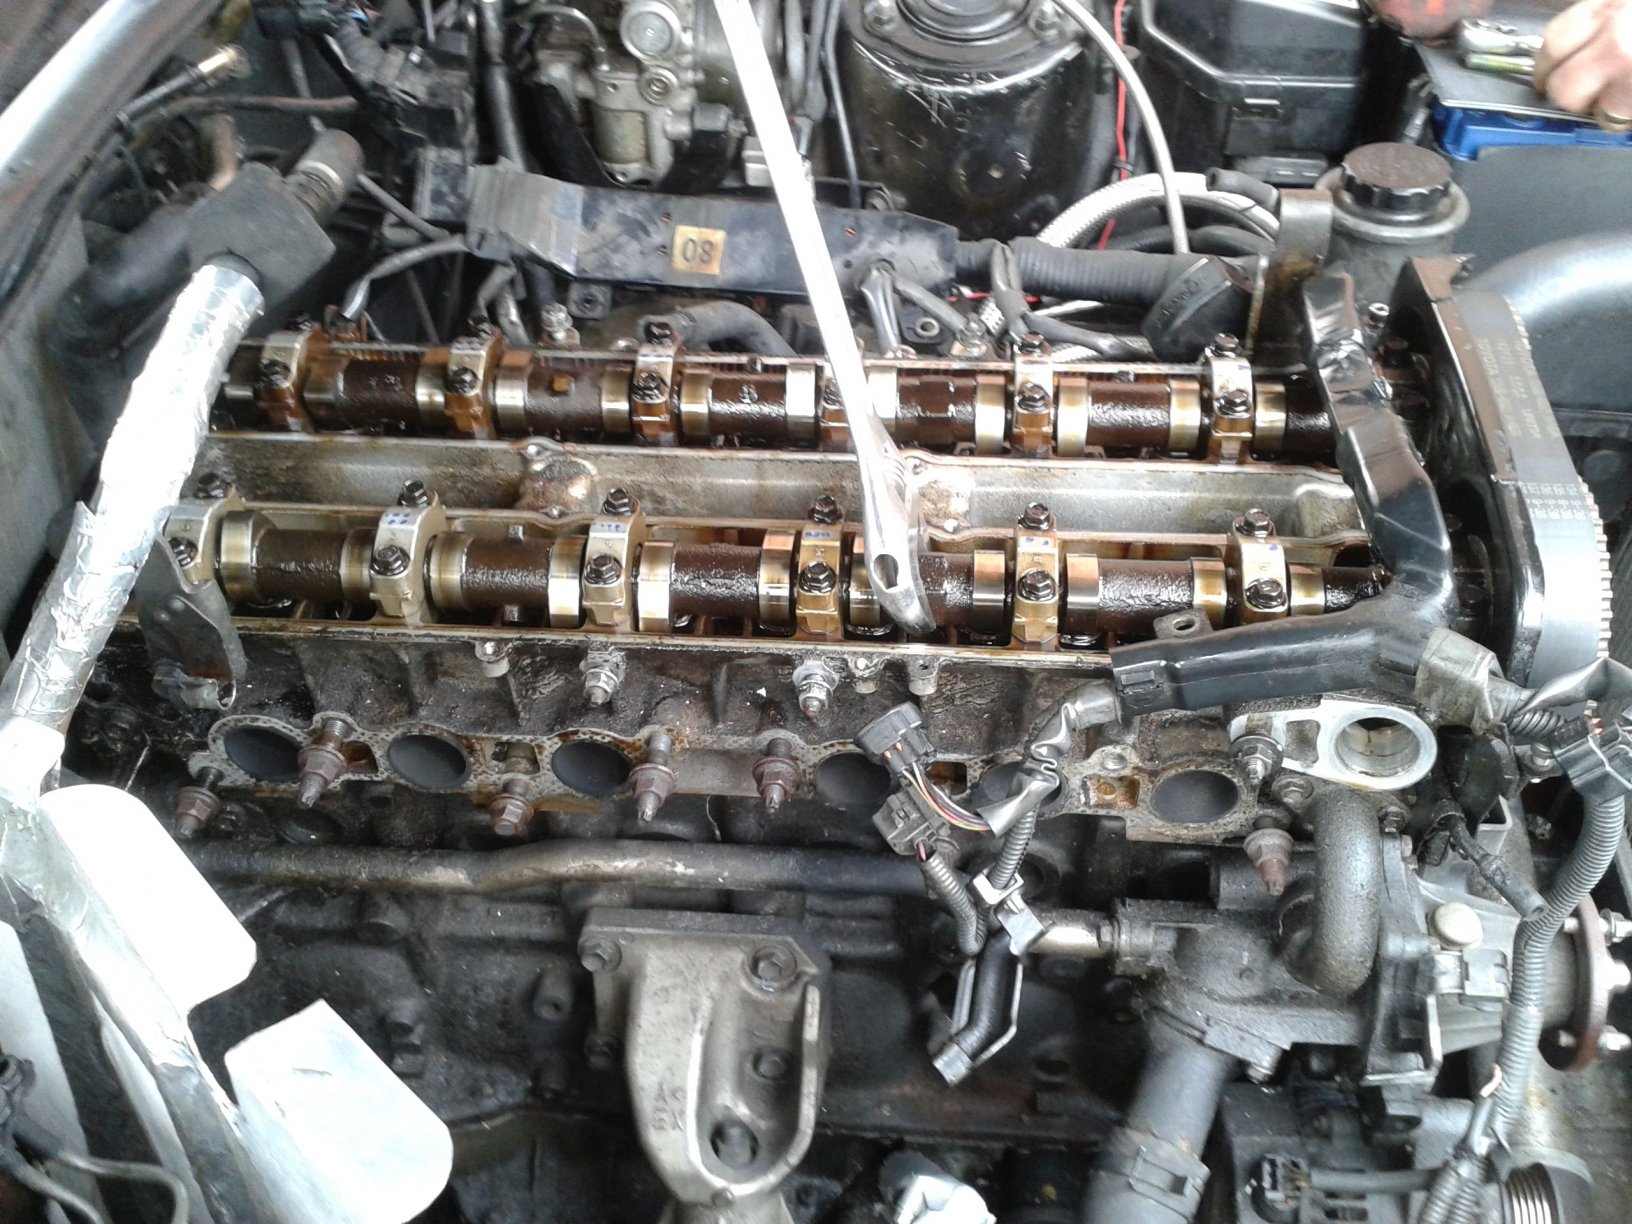
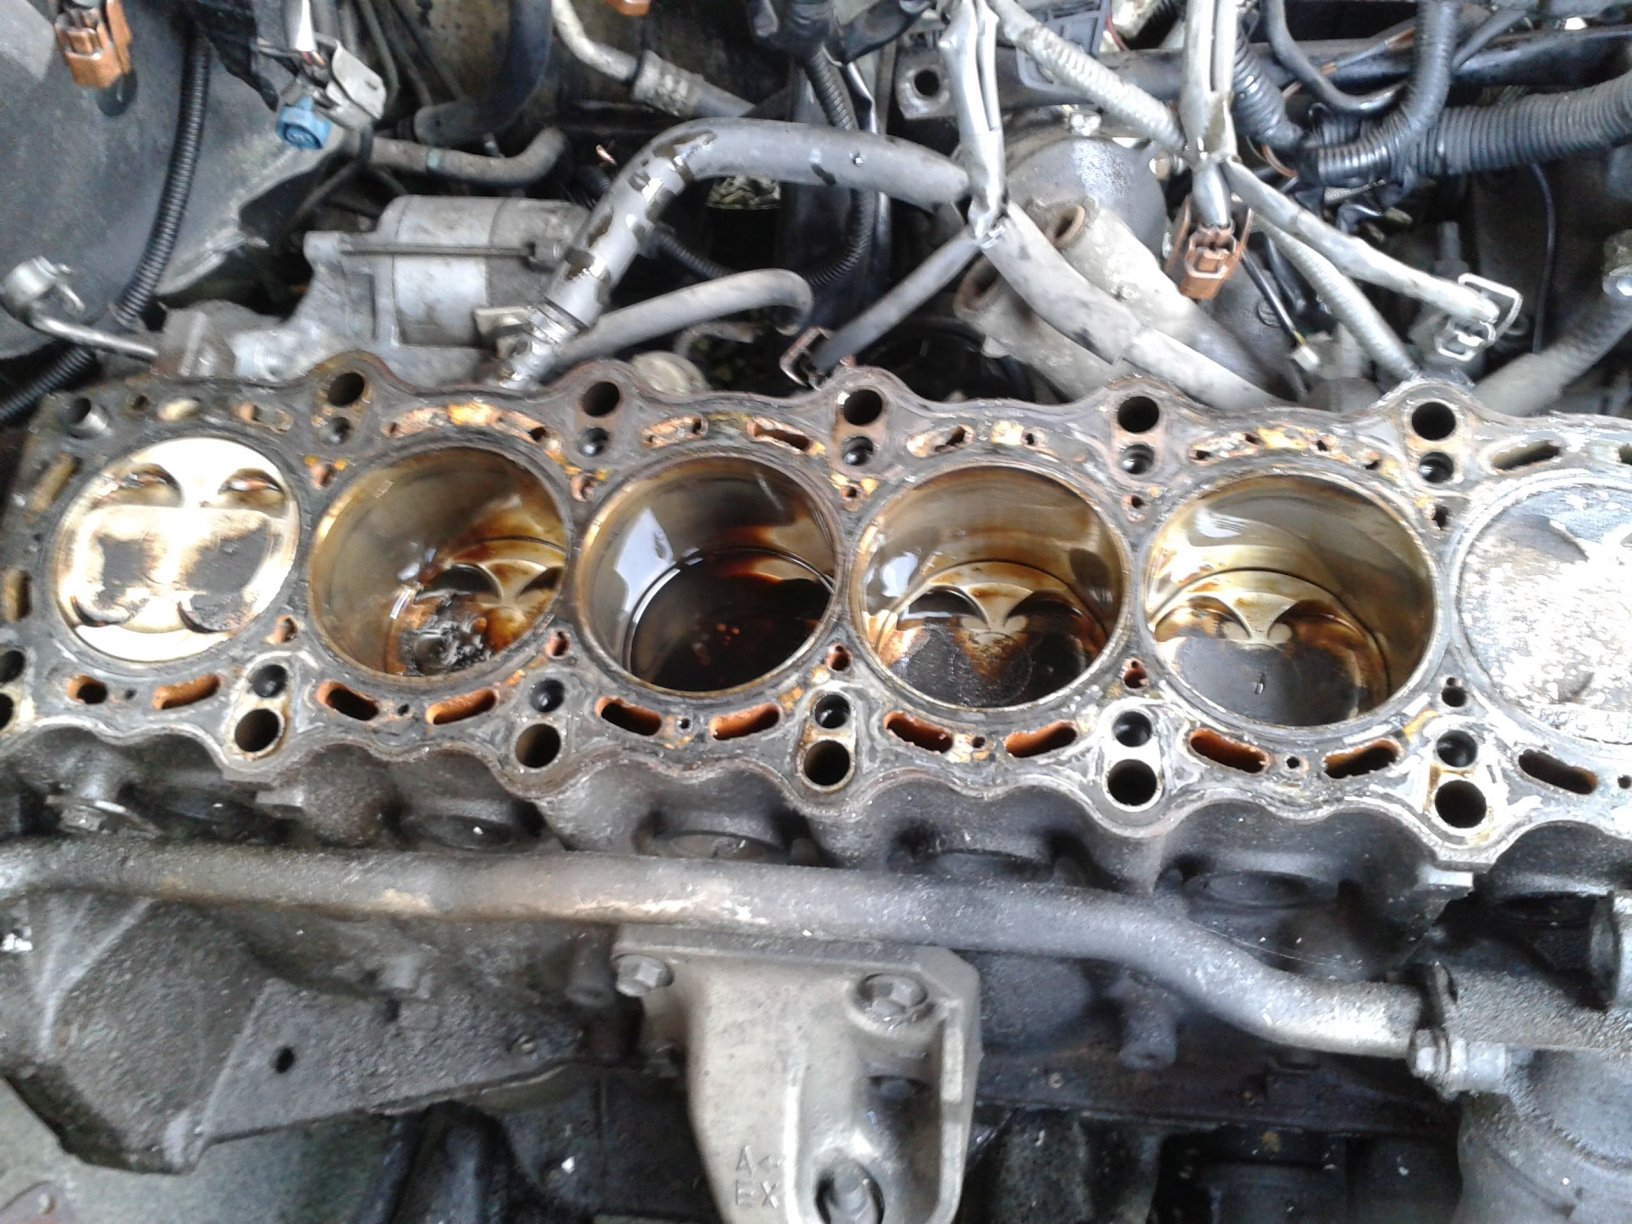
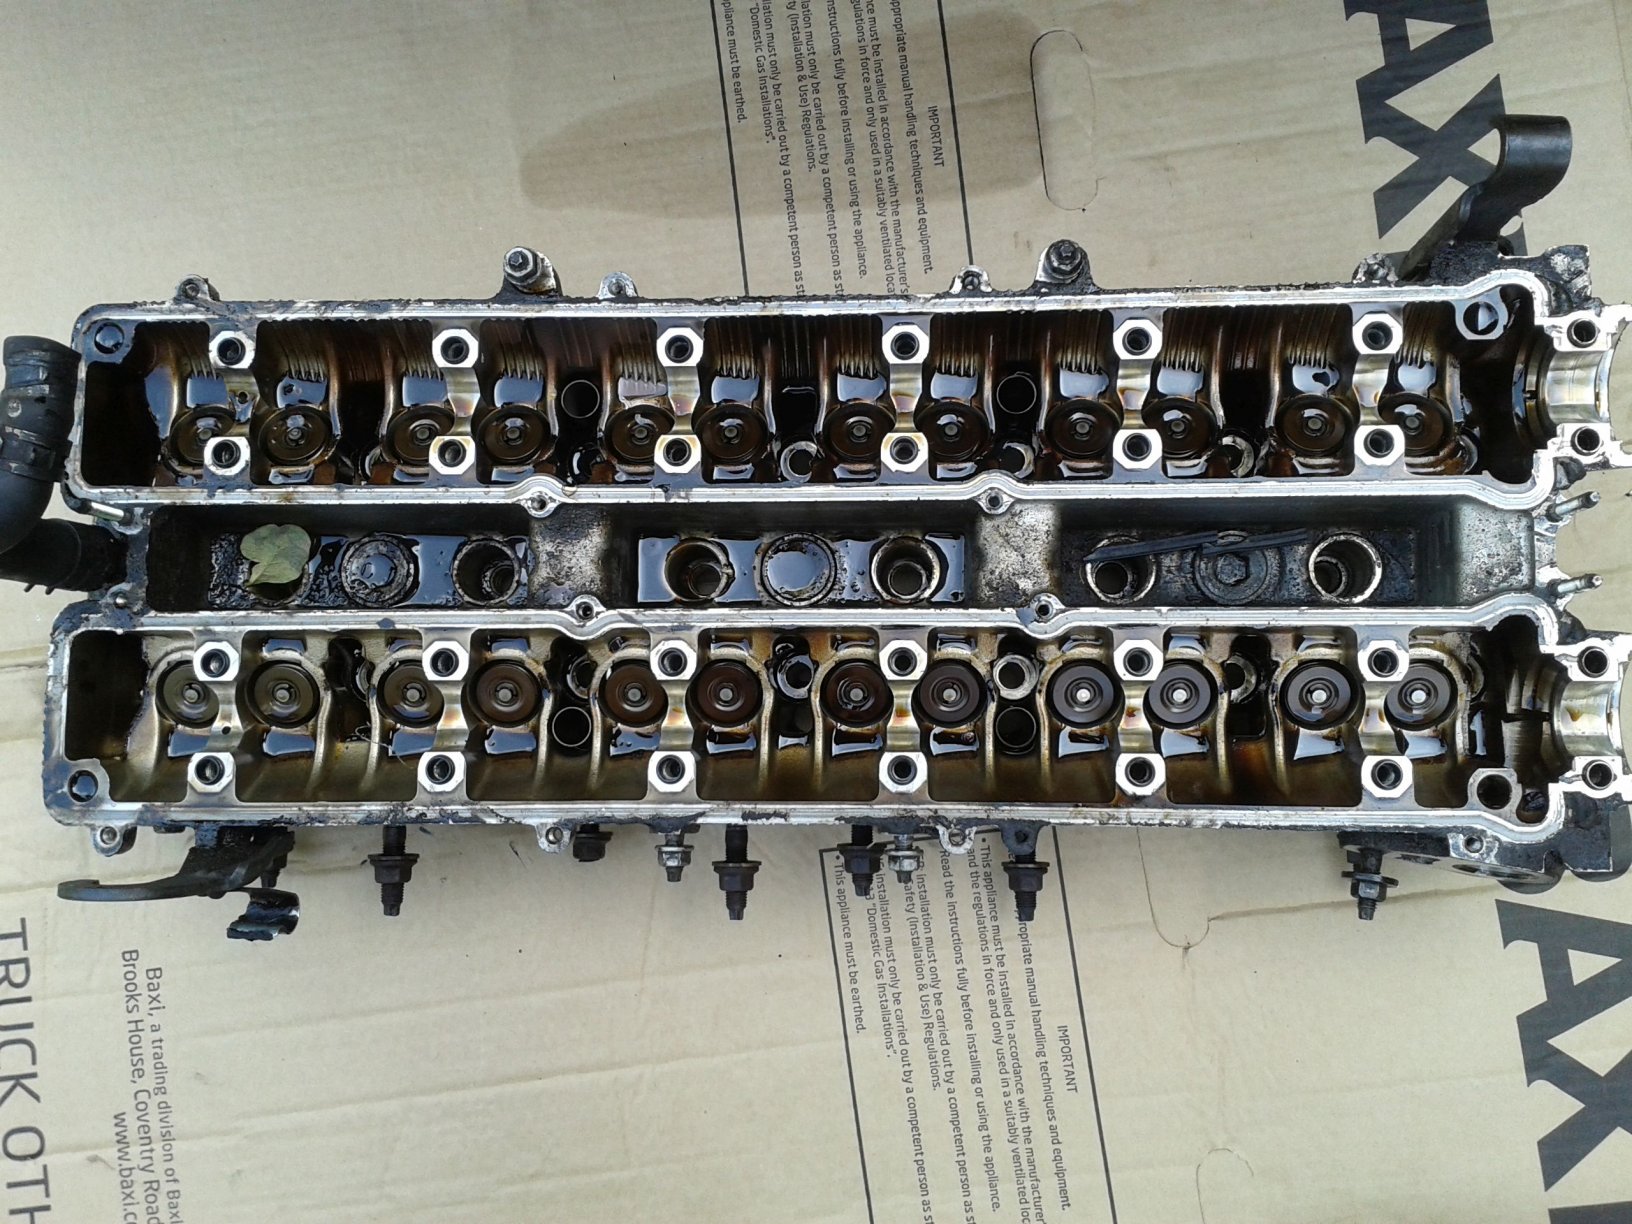
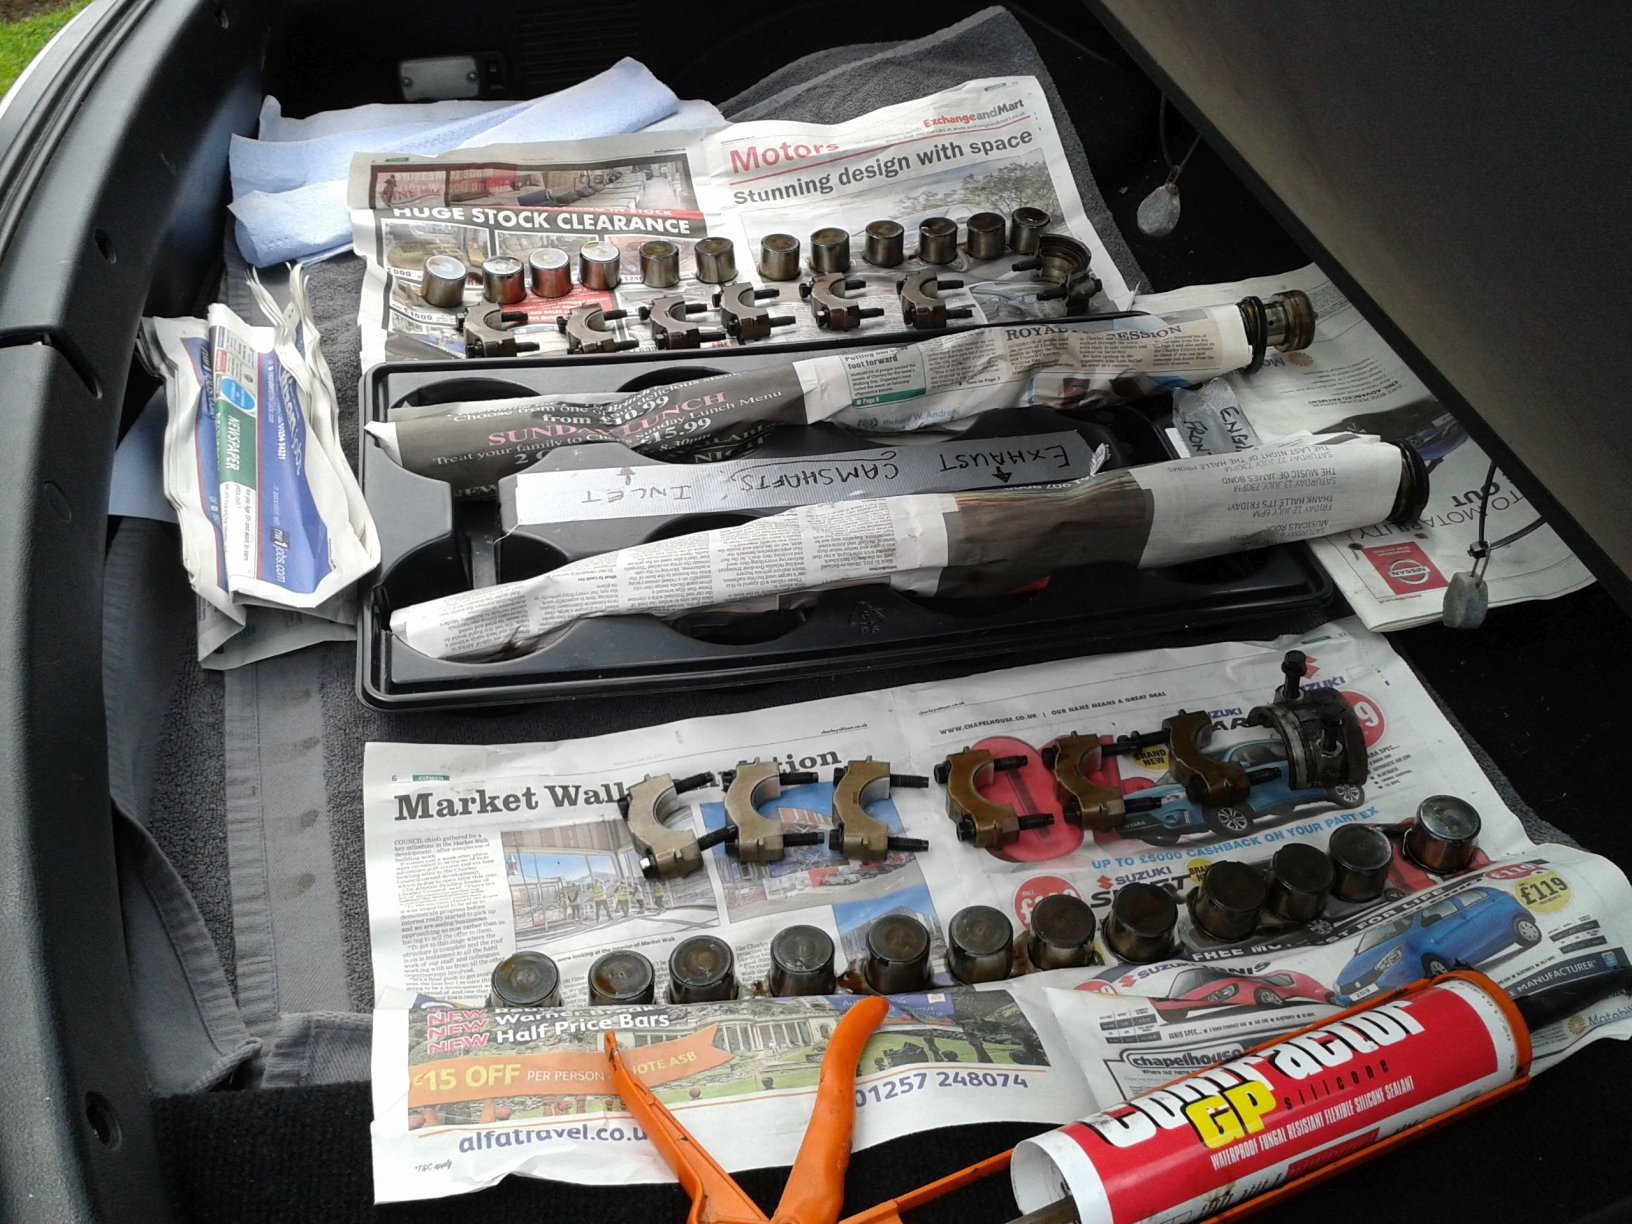
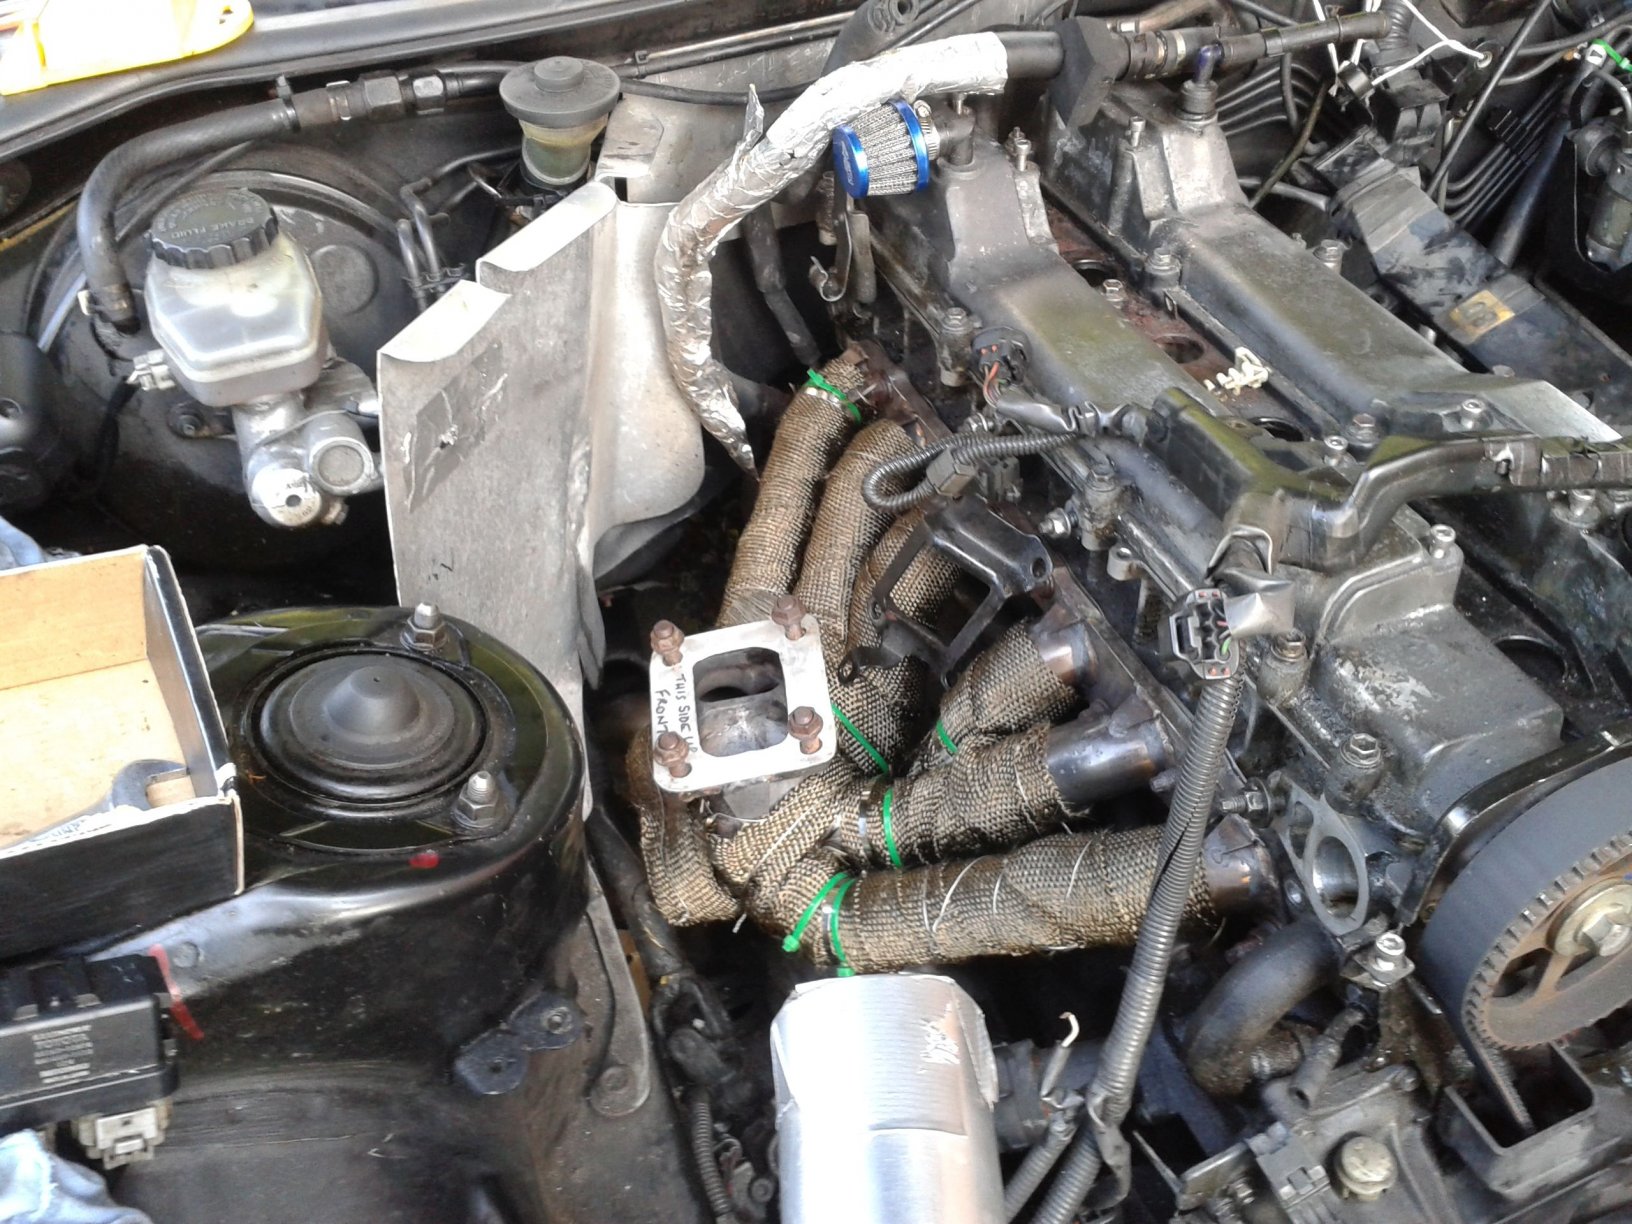
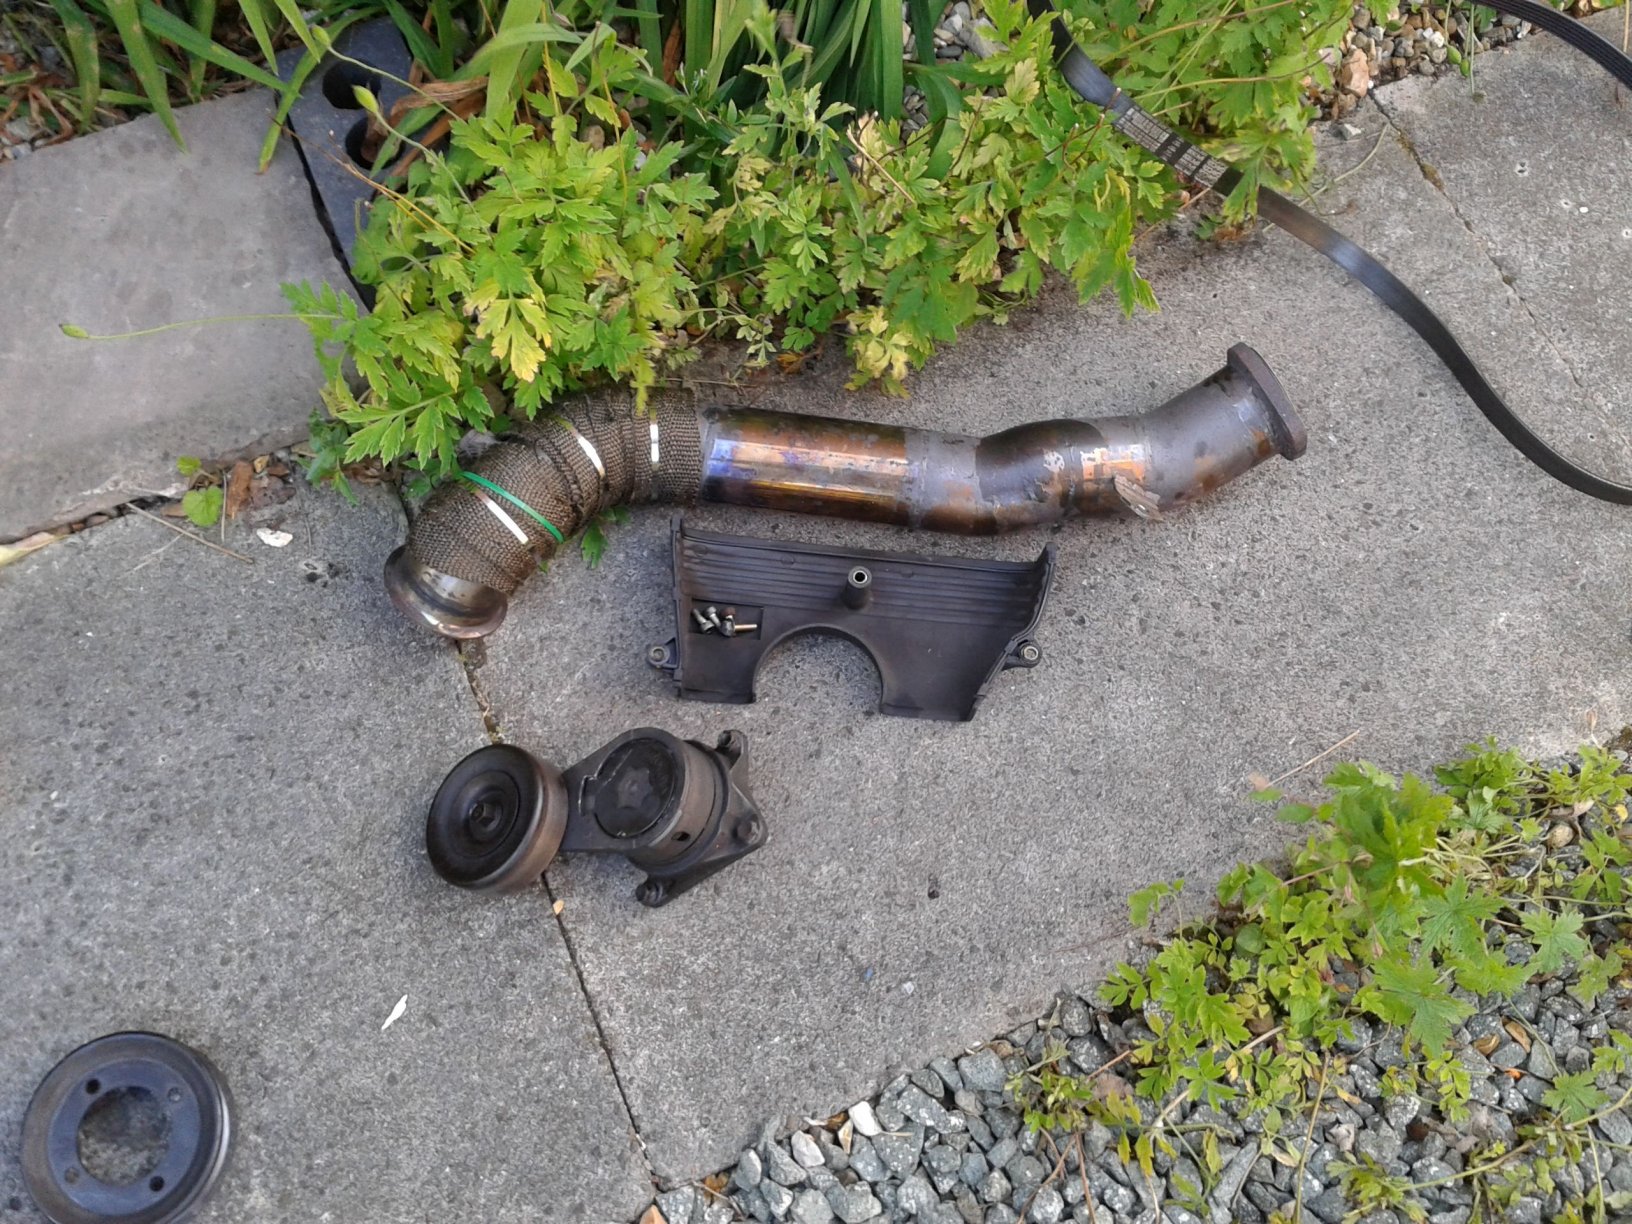
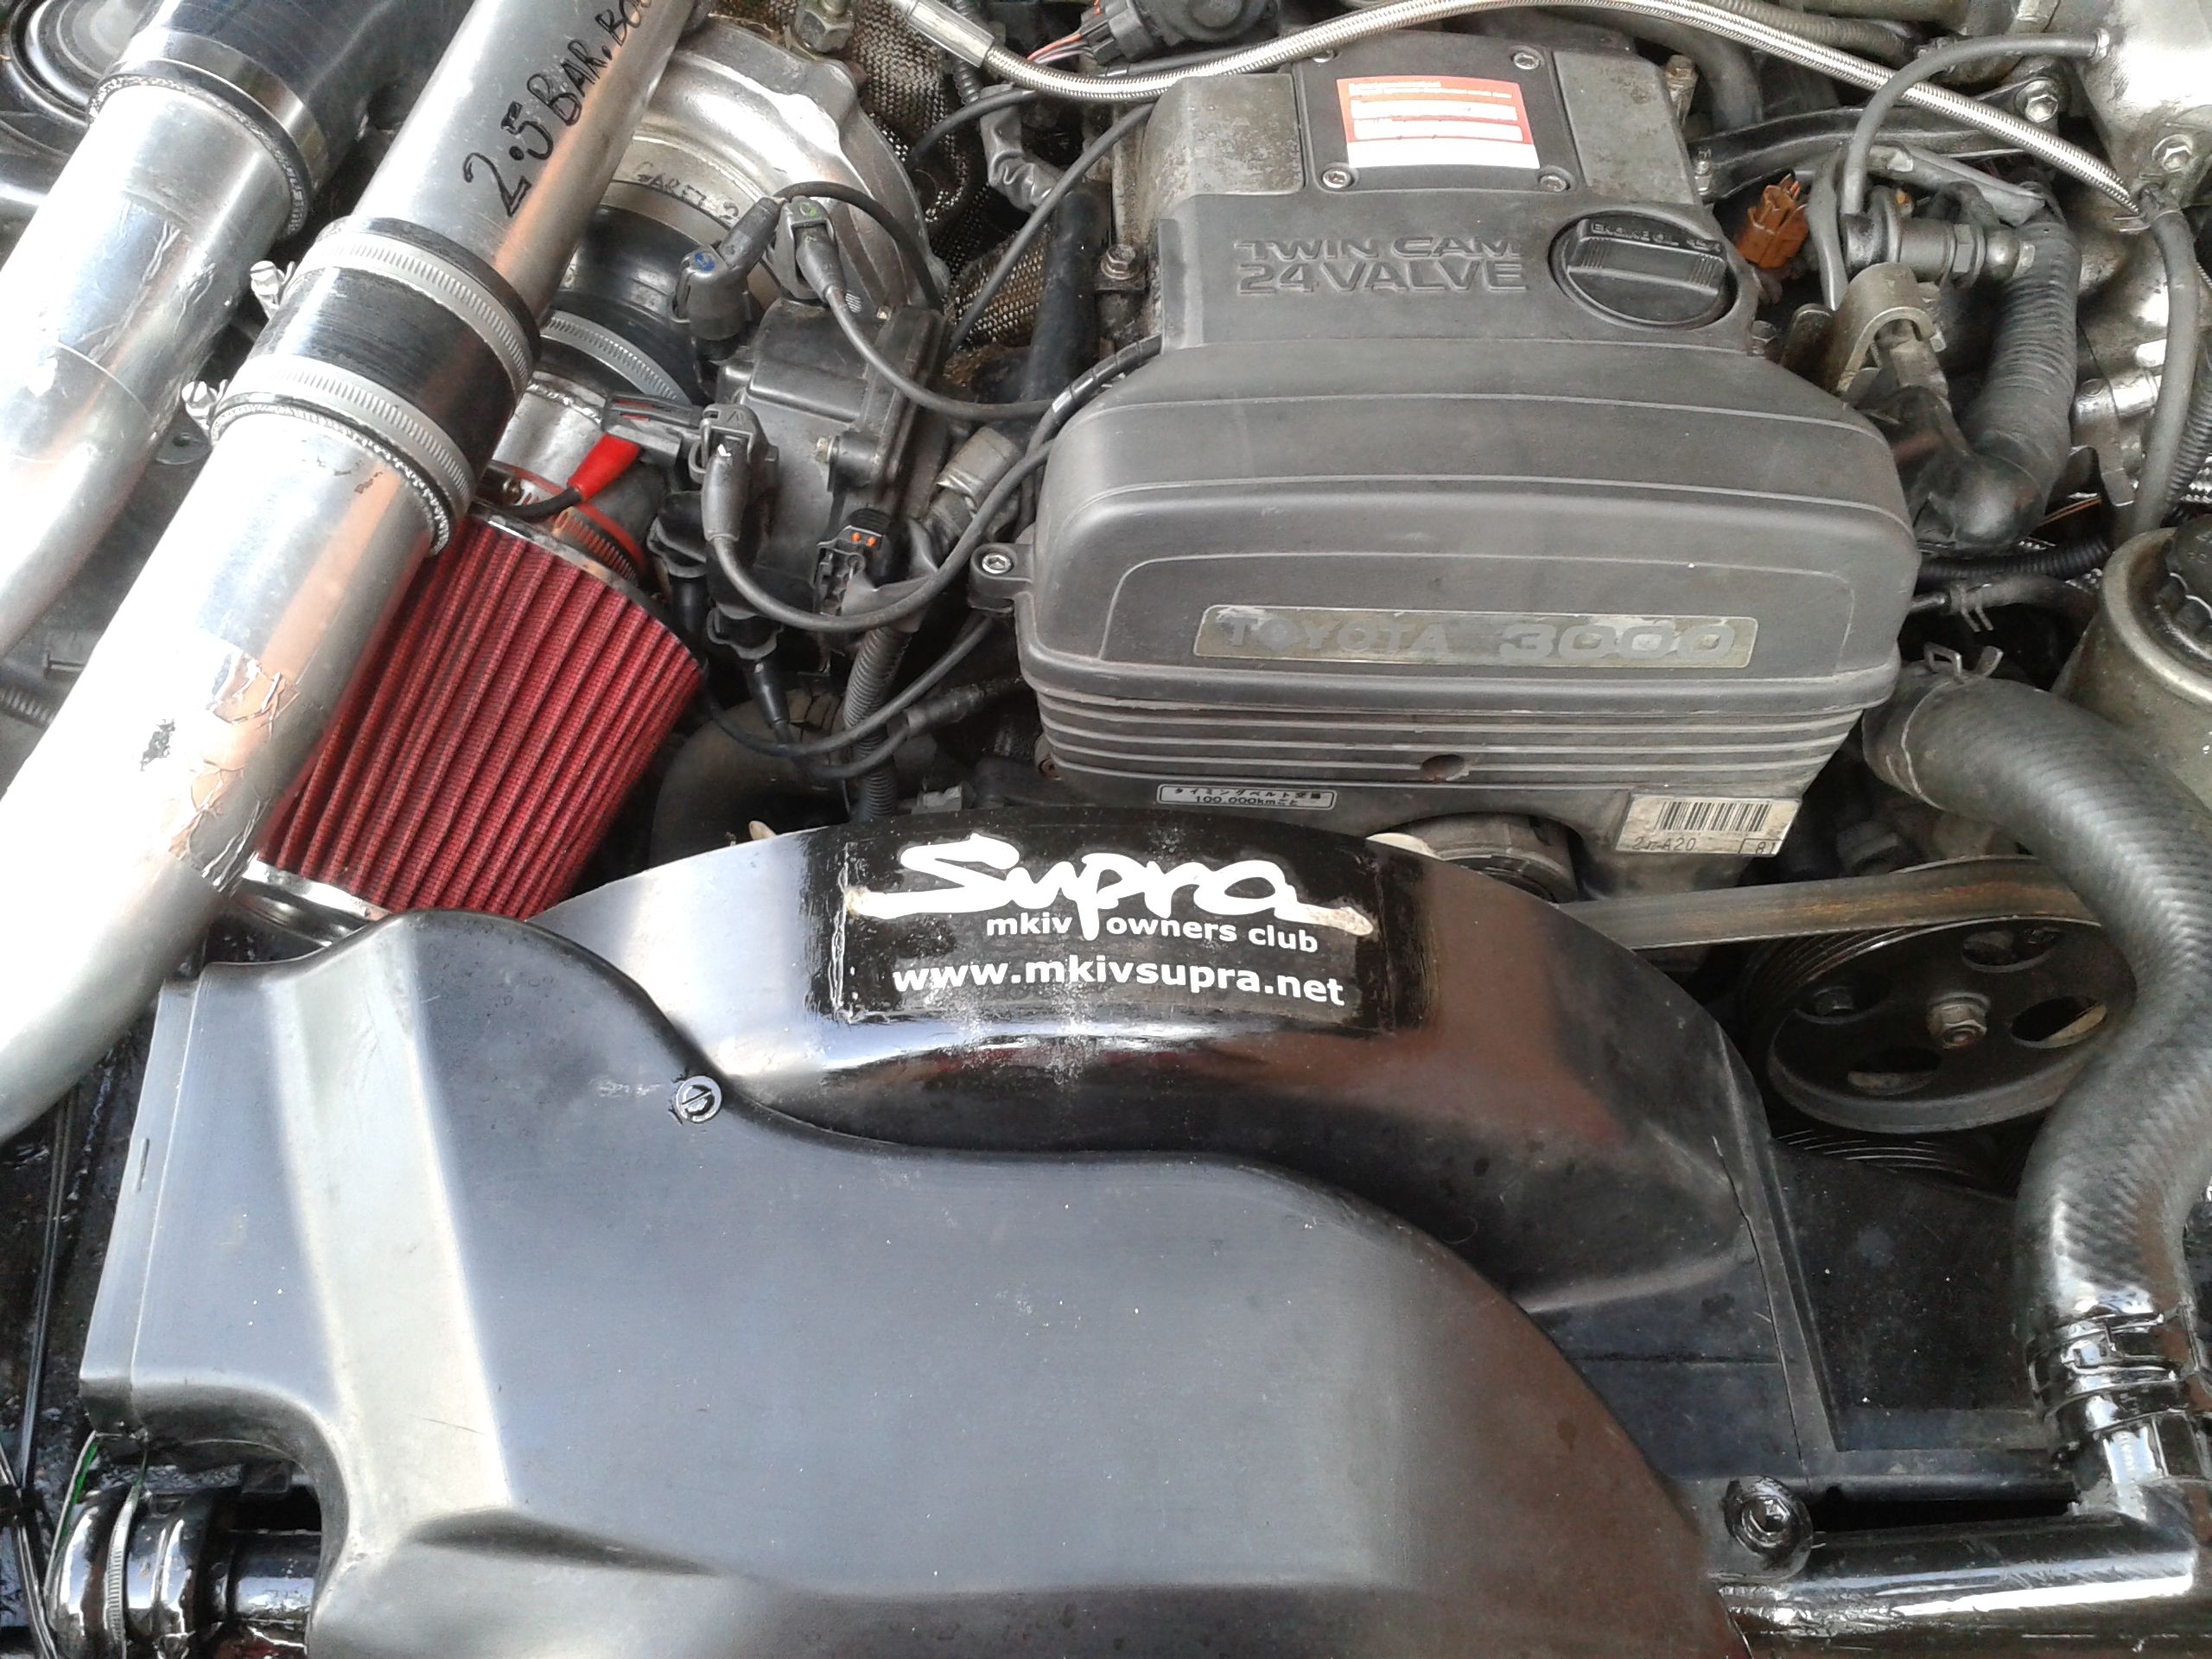
REASSEMBLY: KEY CRITICAL THINGS TO GET RIGHT. 1.Checking the flatness of the head and the block, took the head to a friend of mine who has a precision engineering works, i watched him put it on his 'co-ordinate measuring machine', thankfully the flatness was only out .001inches, and you are aloud .004 inches, (0.1 mm). I did not check the block as it is almost unheard of for this to bow. All surfaces were cleaned to a mirror finish and the replacement gasket was the thicker high performance one cost big bucks. The pistons etc had only light carbon deposits and were cleaned with 'scotchbright' cloth and WD40. The no1 pistion was like the bottom of an electric kettle with calcification precipitate,instead of carbon, this was were the gasket had failed.Prior to any further assembly all cylinders were checked for compression, all ok. The 14 off head bolts were all replaced with new ones and the undoing and re tightening procedure of low,med,high was followed. 2. The camshafts, these are a real pain, everything was marked and the undoing and tightening procedure is critical and time consuming, you have to tighten each shaft in the low,med and high torque settings and then completely slacken them off in the same sequence, then you have to rotate the shaft 33 deg, this is repeated three times, apparently the process is meant to harmonize the molecular structure. The two end oil seals are replaced and the end bearing caps have silastic sealent smeared underneath them. 3. Valve timing and replacement belt and idler, this is quite easy but you need to compress the belt tensioner in your vice and fit the holding pin which keeps the spring compressed, you just remove the pin once it is in place. We rotated the crank shaft pulley to TDC mark and lined the camshaft pulleys up with the marks on top of the casing.The belt was then fitted, we rotated the engine by hand to ensure all internal components were clearing. 4. Tightening up the crankshaft pulley, we had the same problem as we had trying to undo the retaining bolt, it has to be torqued up to 340NM and even with the car in first gear and the wheels chocked, we could not get more than 200 NM, i tried putting some heavy duty 'mole grips' on the outer edge of the 12mm thick pulley and jamming the grips against a bose and a knut on the block, the grips dug in and did not slip, so we achieved the 340NM.The OEM's have a special tool for this problem, but try and find one.(lol). So that just about covers it, i could do another head gasket in half the time now, but it is difficult, nerve wracking at times, expensive and hard on your back, easy to see why garages charge between 1,400 to 2,000 pounds for this operation.I have shelled out circa 500 pounds just for parts etc. I hope all is ok now and if it fails i am buying a box of 'Swan Vestas'. Herbie. 20190716_121016.jpg (652.1 KB) CYL.HD.jpg (647.2 KB) 20190716_121032.jpg (654.0 KB) 20190716_160034.jpg (687.4 KB) 20190717_125925.jpg (857.2 KB) 20190717_104118.jpg (665.4 KB) 20190717_113410.jpg (742.7 KB) 20190717_132342.jpg (708.8 KB) CYLHD(3).jpg (682.0 KB) CYLHD(4).jpg (699.2 KB) 20190717_132307.jpg (777.0 KB) 20190717_125938.jpg (753.8 KB) 20190716_140025.jpg (1,016.5 KB) 20190716_121151.jpg (901.7 KB) 20190716_140 16.jpg (917.3 KB) 20190716_121218.jpg (535.9 KB) 20190716_160102.jpg (621.7 KB) 20190718_163500.jpg (717.0 KB) 20190718_163508.jpg (978.6 KB)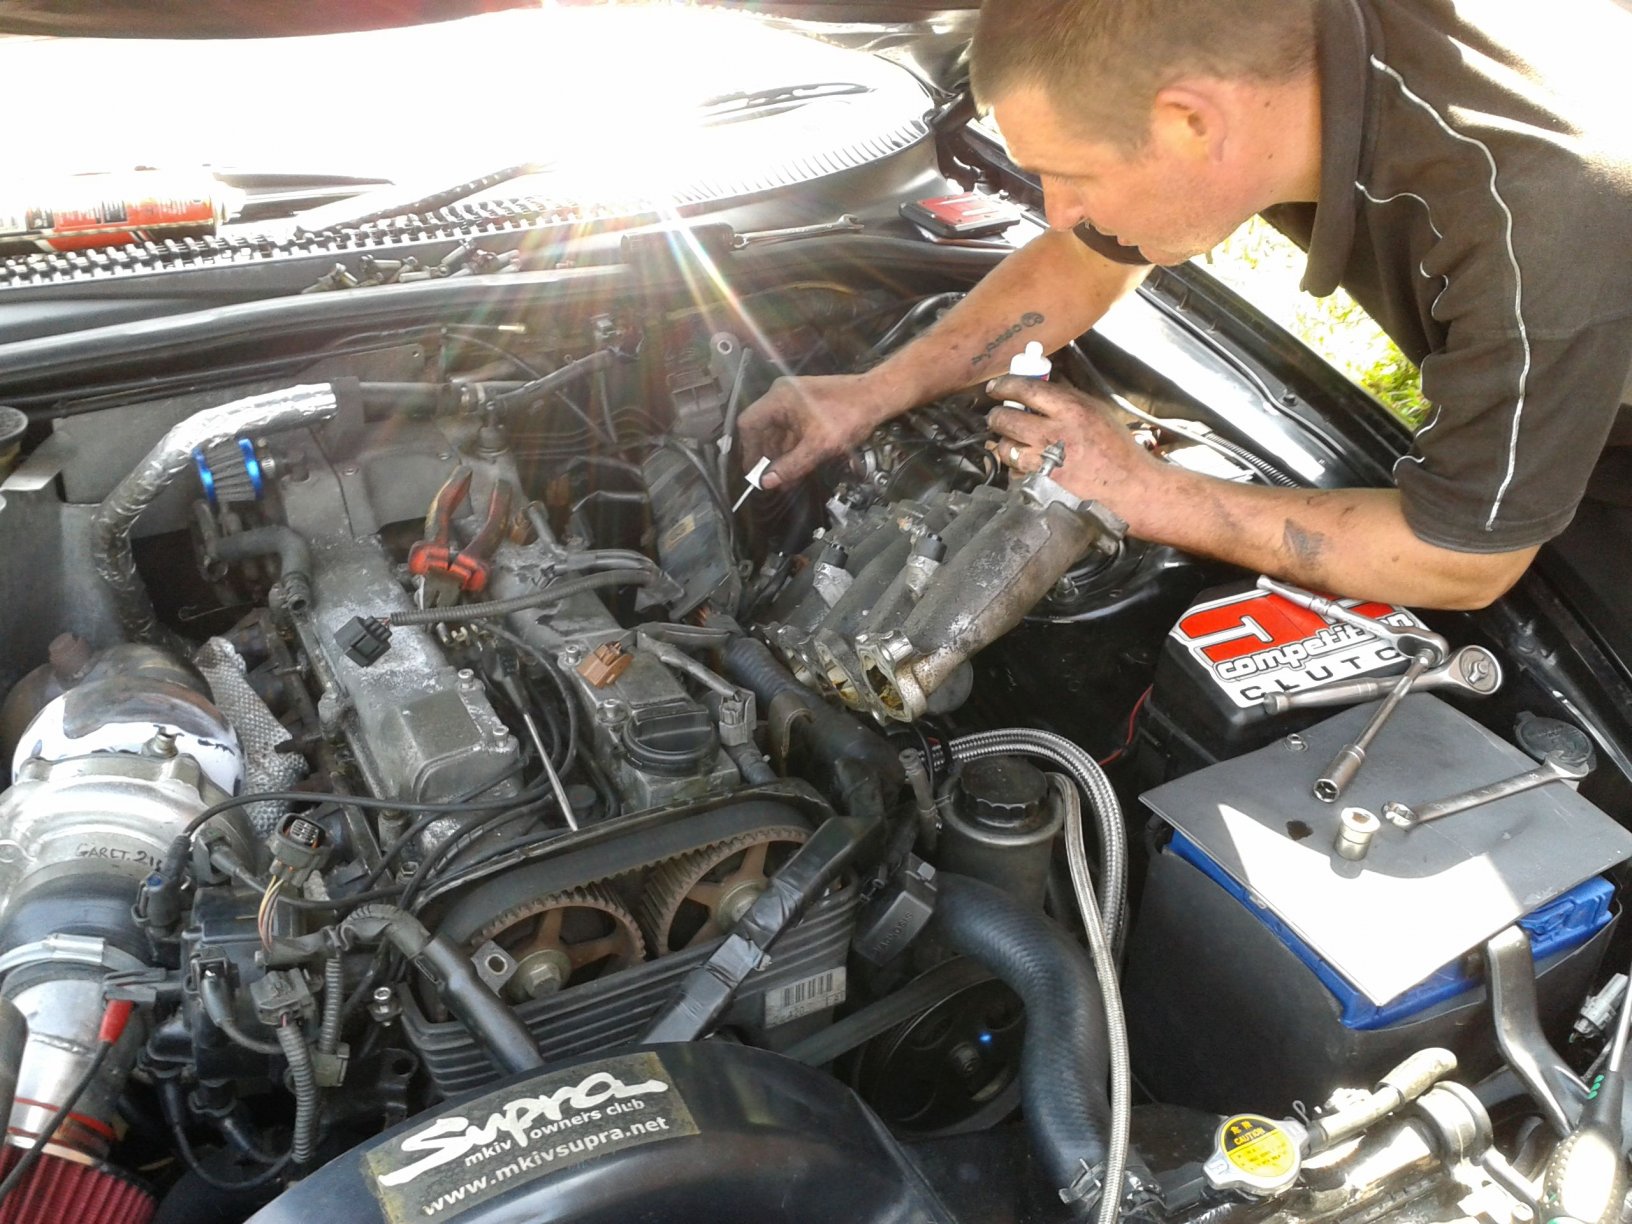

.thumb.jpg.a4473d455c605d405d770cea2b933186.jpg)
.thumb.jpg.fc37d587d4596146f7217153a7c6008b.jpg)

-
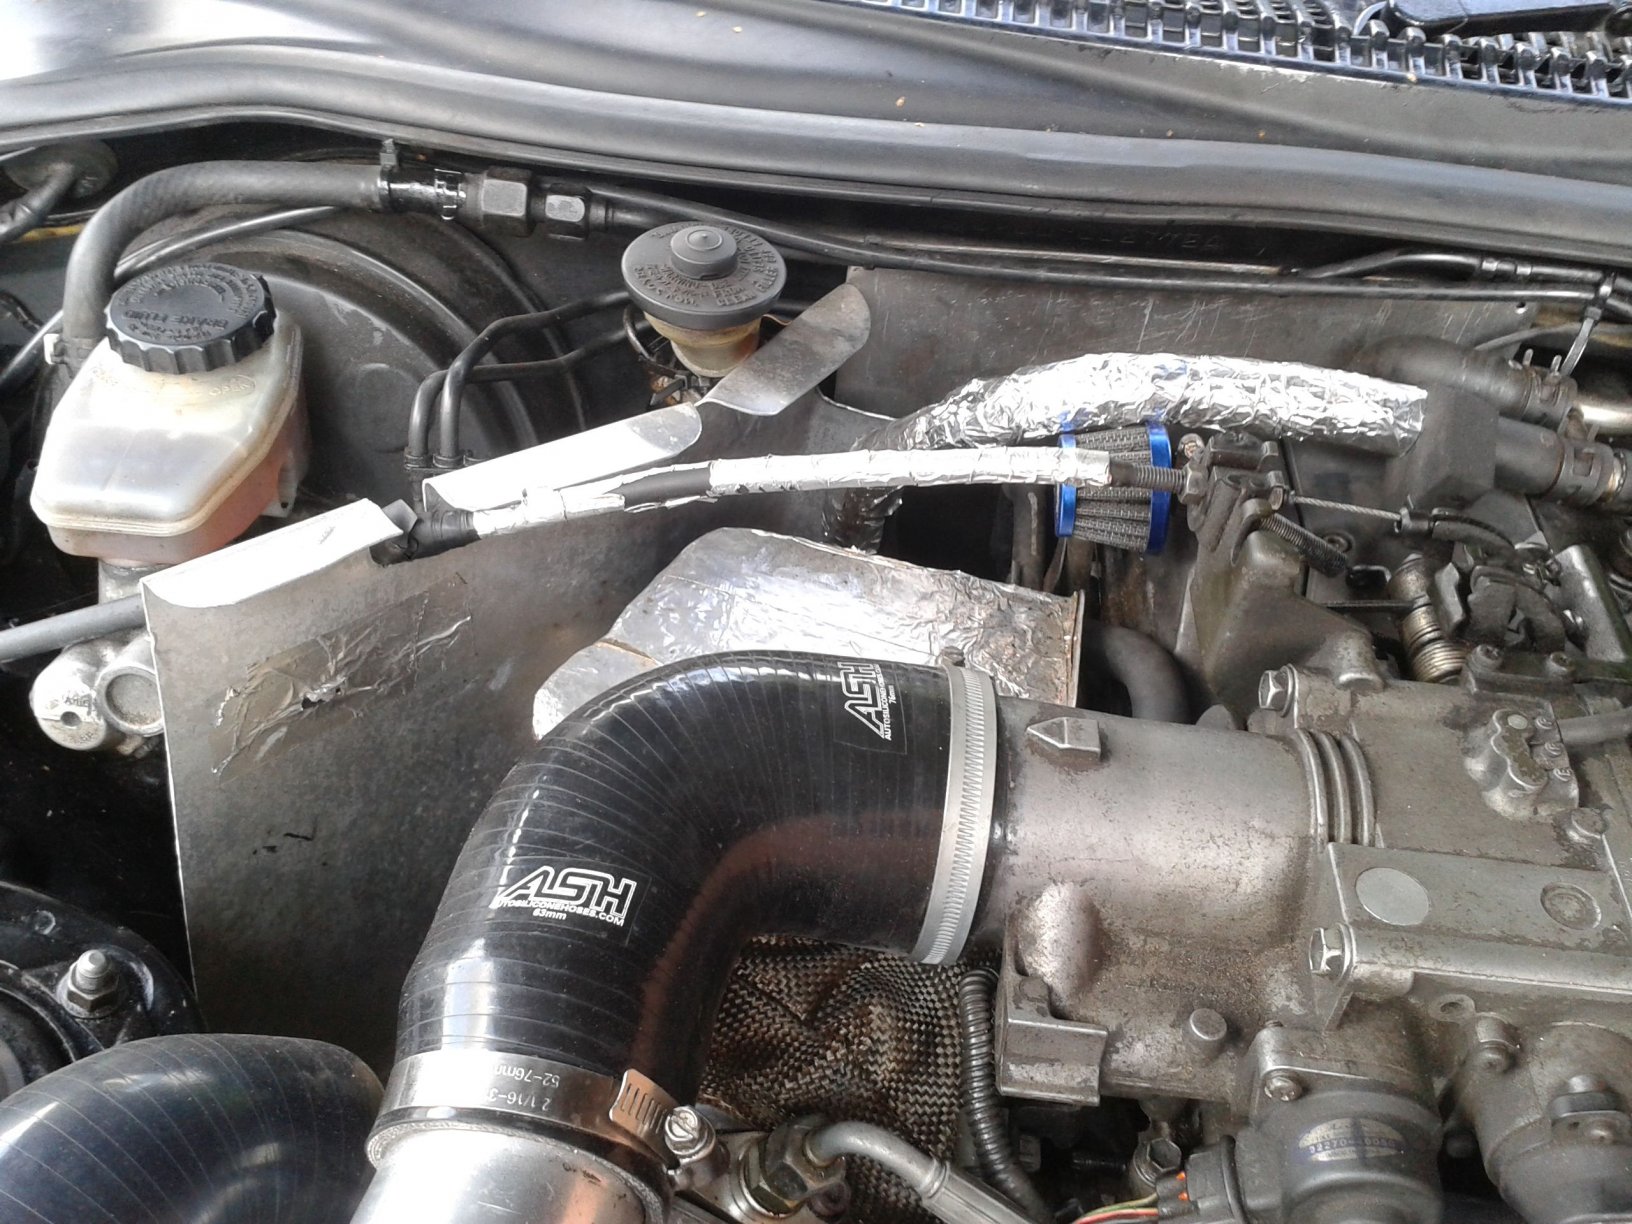
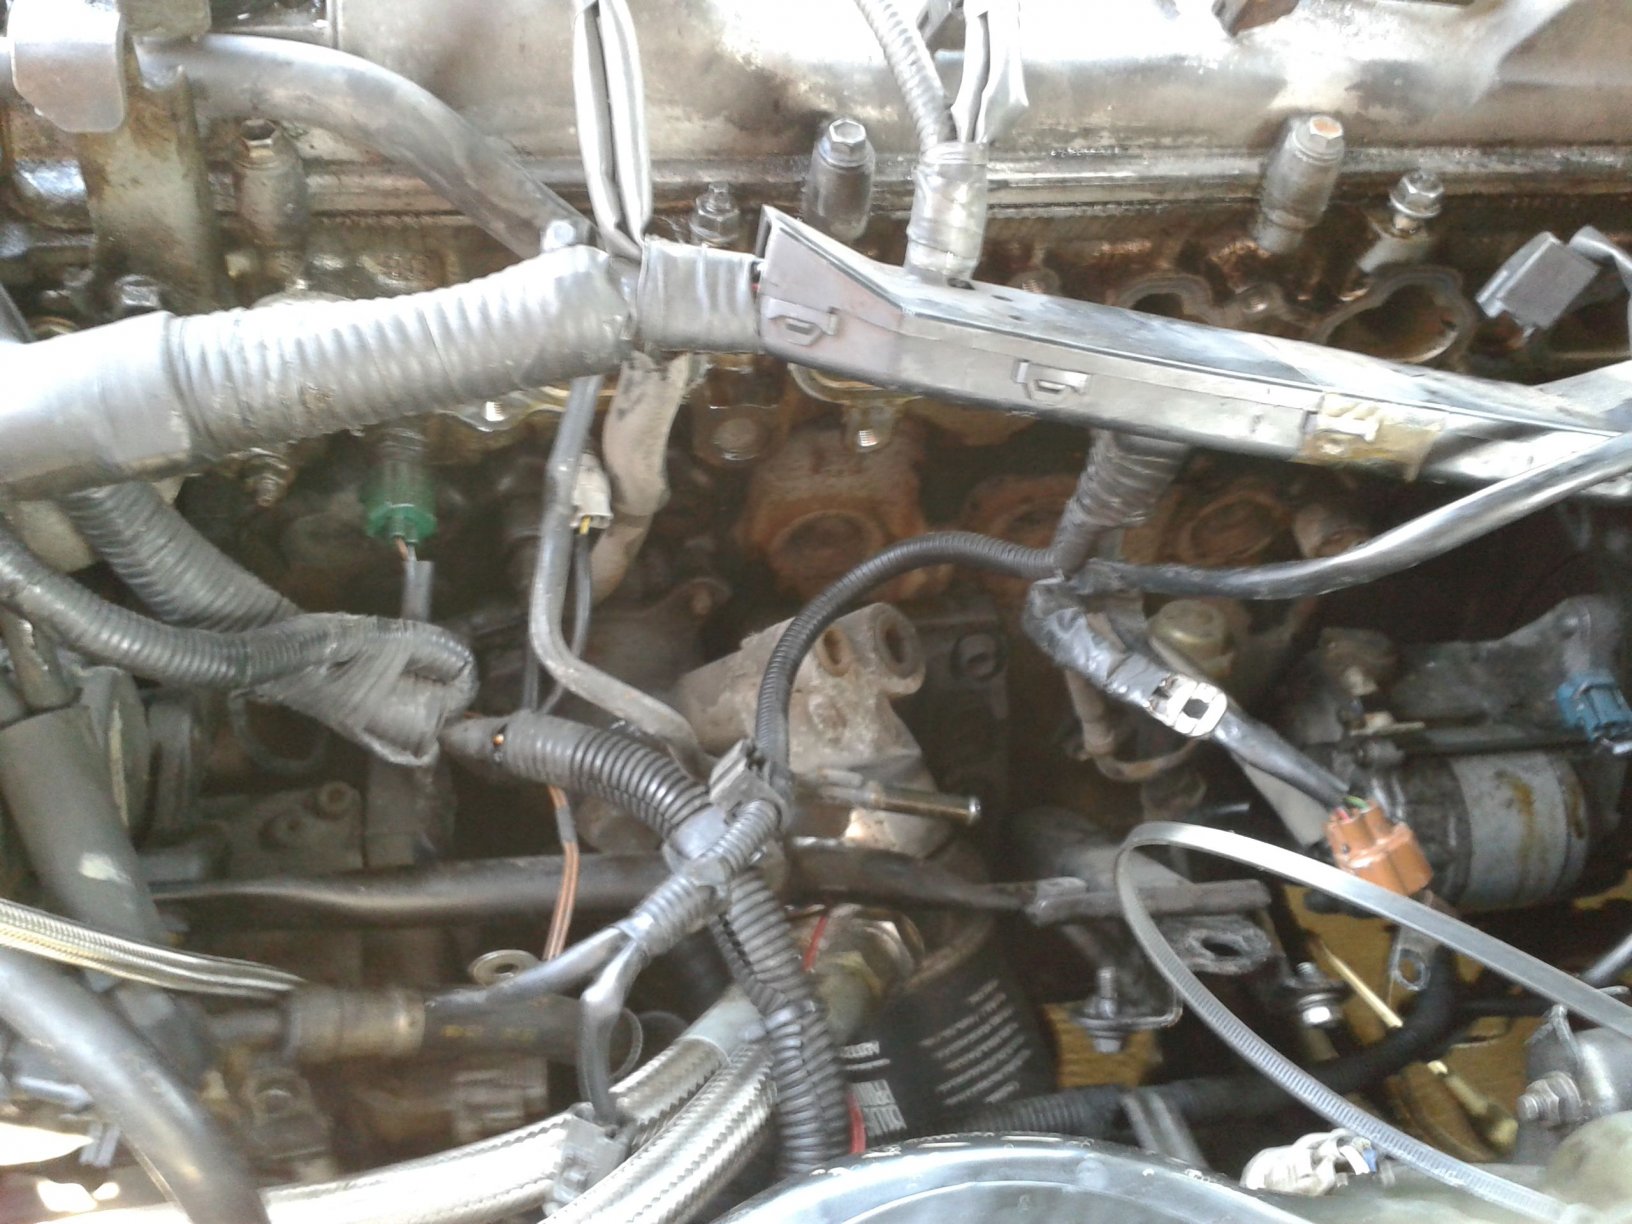
Hi Guys, I have just completed the job and it has been hard work and frustrating. You need the special tools, the parts and the know how, also with it being an NAT there are modifications to wiring and pressure pipes. I downloaded a OEM workshop manual and this was paramount. Disassembly was ok just three problems: 1. The crank shaft pulley was seized on and i could not budge it with a 5 ft bar and 340 NM's torque, i contacted a friend who is my Merc specialist, he said jam the wrench bar into the hole in the chassis and then crank the engine, it worked, out came the massive bolt, BUT, the pulley would not come off, so blow torch and tapping with a hammer and carefully levering, it eventually came off. 2. Could not figure out how to remove the timing belt tensioner, once we removed the crank pulley then we could remove the lower timing belt cover and you then see the 3 bolts that hold the belt tensioner. 3. The starter solenoid 12v supply plug is impossible to gain access to without lifting the car, also the rear knock sensor plug is difficult to reach and vunerble to be damaged, mine got caught by somthing and the head broke off. Had to order two new ones and this stopped the reassembly job due to delivery time from USA,# 30 each, the UK sensors are #196 each and 7 days delivery. I have re rooted the supply wires to the starter and the knock sensors which eliminates this problem. I will do another thread about the re assembly. Herbie.
-
Post nat - knock sensors ? Help ! ! !
herbiemercman replied to herbiemercman's topic in mkiv Technical
Hi Guys, One of the clued up members sent me a PM and pointed out NA or post NAT engines require the two knock sensors, they provide information from a pietzo signal in the component to the ECU, this can affect the timing, fueling, economy, and performance, so it seems to me to be a key component. When the component is broken or faulty you should get the warning light on the dash display, and some times poor performance or knocking, engine damage is also possible. I hope this info helps any of you as i have had the car 22 years from new and i had never heard about a knock sensor and what it does. Finally i would point out that if you are removing the air intake manifold the plastic heads of the two knock sensors are vunrable to be damaged as the detachable plugs are very difficult to pull off to disconnect. I hope you do not get into this situation but if you do this thread should help you. Herbie. -
Hi Guys, Until today rebuilding the engine after me changing the cylinder head gasket i found out what a "Knock Sensor" is, never heard of this item previously. On the 1996 NA there are two of these on the block just above the starter motor, one of them had been damaged and was not working. I do not know if these things are required to feed the ECU as i do not know if they are covered by the remap?. On the line the information for every day cars is that the knock sensors are a vital piece of equipment and engine damage and very rough running can be experienced, also the red warning light comes on the dashboard. Hopefully some one out there can advise me please. The OEM want over £200 each to replace them and 7 days for delivery, alternatively they are available from China £15 each and 20 days for delivery. Herbie.
-
Can you say you have a car if it is all electric?
herbiemercman replied to herbiemercman's topic in Supra Chat
I have just spent 7 hrs last weekend traveling from Essex to Preston, the M11 was closed due to a serious accident and the 'smart motorway' work on the M6 had many hold ups and massive congestion, i was driving my Merc estate work horse which is an automatic, i realised it would have been a night mare in the Supra, the amount of times i would have operated the clutch and the gear lever. I think my Supra is only tenable where i can choose where and when to drive it. Herbie. -
Hi Guys, My drinking friend at my local has just shelled out 27K for a BMW all electric car, it has very large diameter wheels with very narrow tyres, it is dangerously silent on approach,it has a range of 120 miles, it rockets up to 30 MPH but then falls away, this is where a fast internal combustion driven car would pull away and leave it behind. I realize that this is a small electric car and the 'Tesler' boys would be a different matter for acceleration etc. I cannot see why a 'petrol head' like my friend would not miss the exhaust sound and the gear changes, sort of trying to drive the car, he also tells me he doesn't often use the brakes as the induction on the electric motor does the braking, also if there is a white line on the road it steers as well. For me , these are NOT cars, they are just a means of transport without the need for the skills of the driver and the enjoyment from the power, noise and gear changing of a real car. What do you think?
-
Head gasket replacement - some questions.
herbiemercman replied to herbiemercman's topic in mkiv Technical
Hi Style, I have just ordered the tt gasket it is thicker and has more width surrounding the cylinders, it should drop the compression ratio from 10 to 1 to 9 to 1, i am hoping a remap is not required? This is not something i had thought of, do you know how it would afect the performance and any engine damage? Herbie. -
Head gasket replacement - some questions.
herbiemercman replied to herbiemercman's topic in mkiv Technical
Hi Guys, Many thanks for your info especially, dunk and Jim, great diags etc. Mellonman yes that may be a good idea? Do any of you have any advice on the actual type of gasket? i purchased the OEM standard kit for the NA. I think owning a Supra would be a 'balls ache' without this club and its members. Herbie. -
Hi Guys, There must be some of you who have undertaken this job, at this point in time i feel it is one of the most daunting jobs i am about to carry out. Q1. Is it easier to take the engine out, and why? Q2. Do you need to remove the camshafts to expose the 14 head bolts? Q3. What is the maximum 'skimming' you can take off if you are applying a stock gasket? I am aware that there are four critical factors in the job: 1.You have to loosen the 14 bolts in a certain order, and it has to be done in three stages, loosen a bit, then a bit more, then full loosening for removal. 2.Tightening the head bolts is the same sequence and procedure as 1. above. 3. Checking the 'flatness' of the head with a engineer's straight edge, and feeler gauge, max warp 0.1mm (.0004.inches). 4. Resetting the valve timing. Any info will be much appreciated. Herbie.


.jpg.16ff7b865c3a90b4e8d00e6c91e63cd5.jpg)
.jpg.5213e55f8ec39f7bf35adfda95230753.jpg)


