DaveR
-
Posts
3601 -
Joined
Content Type
Profiles
Forums
Store
Blogs
Events
Downloads
Supra Articles
Gallery
Everything posted by DaveR
-
Exactly!
-
and Good luck with the purchase - there's plenty of info on this 'ere forum.
-
Love it! I know what you mean about the fly thing - I think I halved the fly population of Wales over the two days of last weekend!
-
So how was the round trip to work and back on board The Dark Knight then? I like to think boost, giggling, boost,
-
Stopitstopitstopitstopitstopit!!! :spank: :spank: :spank: I'd love to, really, but it's been less than a month since the rest of the work has been paid off!
-
This.
-
Like it.
-
Be done with unsightly and impossible-to-monitor dials everywhere and install a DASH2 (or equivalent if you have a preference). I've had mine for a while now and - although I freely admit there have been teething issues and it's not QUITE set up perfectly yet - it's really intuitive to use. Just another option for you!
-
Ooooooooohhhhhh...
-
Goddammit...! I guess I could remove it and do the job again to re-centre everything but now I've put a bead of the sealant all the way around I'm reluctant to do so... Oh well. If When I get my carbon boot lid, if I decide to transfer the lip spoiler across, I know for next time... Getrag FTW every time!! And yeah I'm still undecided about Bluewater so watch this space. My two opposing schools of thought on the matter are that it would be nice to increase the rev limit to extract more top-end grunt, which I've heard isn't recommended on a 3.4l 2JZ because it makes it over-square; on the other hand, low-end shove and spooling the turbo quicker (with more boost... ) sounds nice too... I just don't know!!!
-
Ohhhhhhhhhhhhhh! Gotcha.
-
???? My brain hurts...
-
Good call, good call!
-
I do far too much of a good job of pre-spending my own money as it is!
-
Oh yeah...! Yeah it'd be nice to balance everything, increase the rev limit and crank up the boost a notch or two... I've literally been out of debt (and therefore the actual, technical, black-and-white owner of my car) since the start of this month, so I can't get back into debt in practically the same breath! Also,
-
Stop it!
-
Yeah the thought did occur to me at the time that this would mean yet more similarities... Damn straight! If I'm keeping them afloat I want a discount!
-
Yeah the amount I've spent at Whifbitz over the last 16 months is, shall we say, sizeable so I always swing a deal! I'm umm-ing and ah-ing about BW, so don't write it off yet. I'll make the call on the day... Ref the cam belt, this is the problem with posting multiple updates - people miss some of them! So, see Post #359.
-
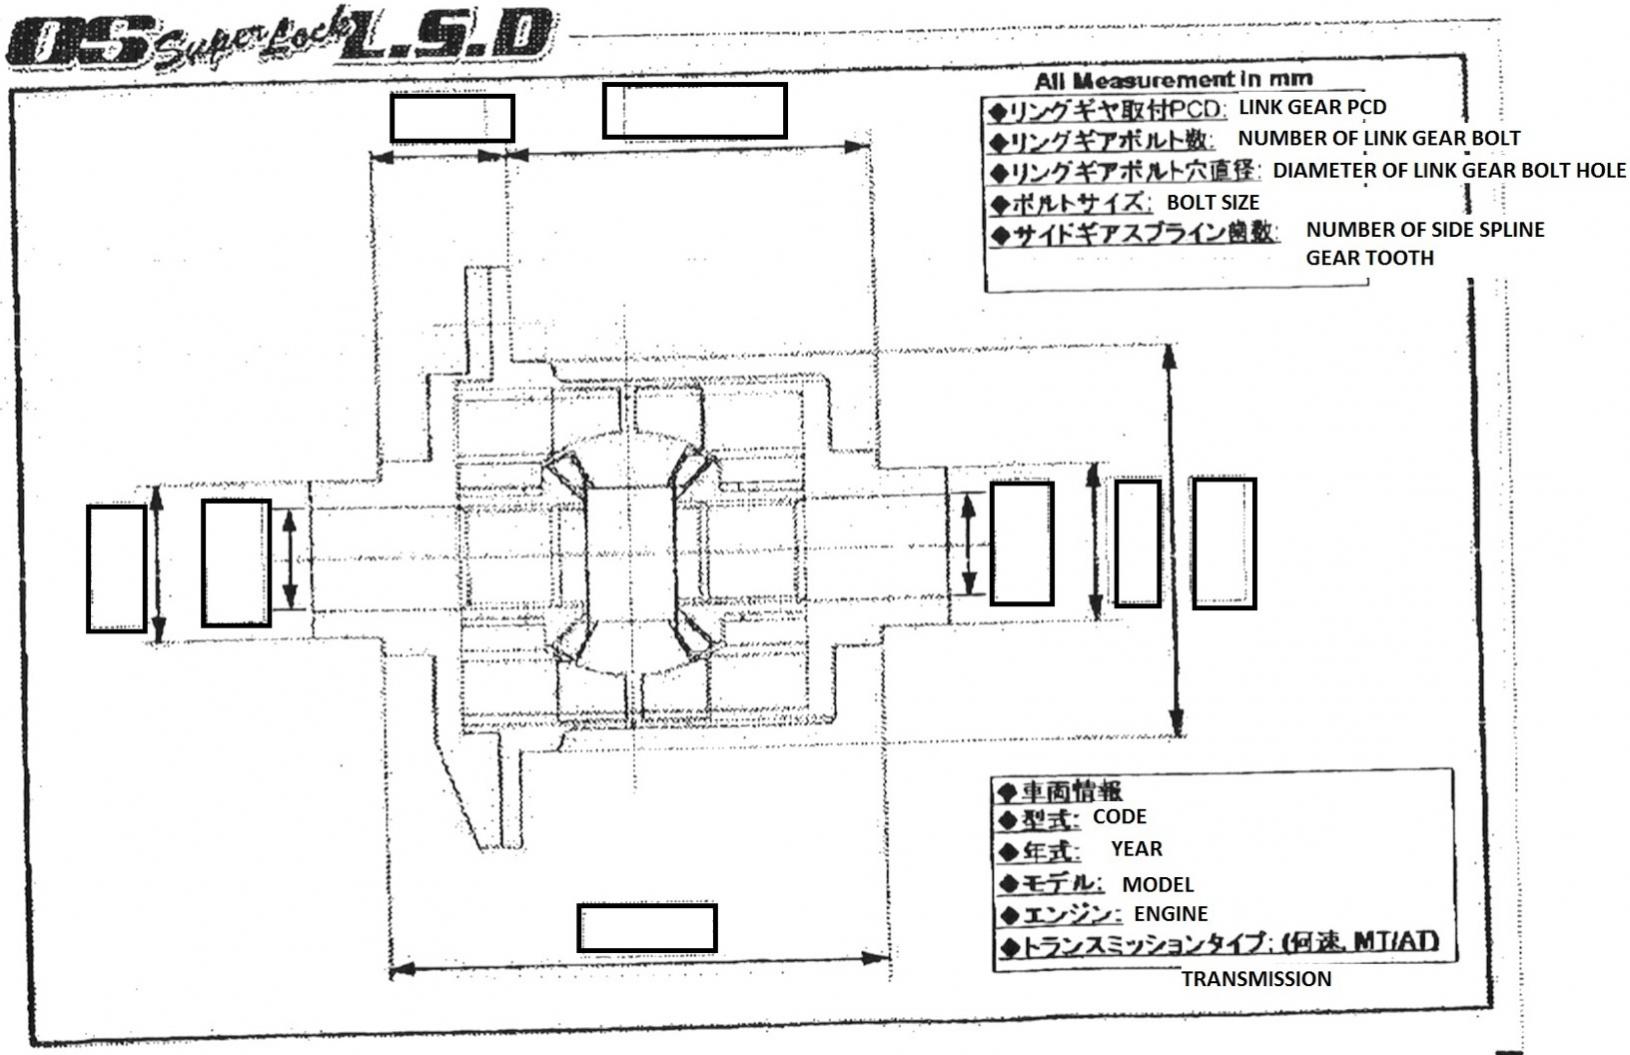
I've paid a deposit for an OS Giken 1.5 way LSD through TDI in Essex. Despite the fact that there seems to be only 4 different types of diff' for all Supra models (link here), only 2 of which apply to a turbo'd Mk4 and that I've sent all of the details of my car from my VIN plate, OS Giken are saying they need a number of different measurements before they can spec the correct one and send it to me... Since removing my diff to take these measurements isn't a five minute job and the whole point of pre-ordering like I have was so I didn't have my car off the road for ages, I'm hoping someone on here has access to the relevant measurements of my stock B03B torsen LSD... The measurements I need are shown on this diagram and explained in the box on the top right of the image (I've already sent through the various vehicle details thy've asked for in the other box): PLEASE HELP!!
-
It is indeed the Whifbitz one - don't worry about the cost though, I got a good deal! I'm not sure if I'll make the BW meet next week simply because I'm starting back at work the next morning. Yes that's right, for anyone not paying attention, that means I'm starting on the Saturday... Yeah that was my first thought but the problem was access - I couldn't get a decent sized washer through the double inner skin and reliably not drop it into the insides of the boot lid (like I managed with that socket extension... ), which is why I came up with the slotted hole idea. Uh and then forgot to do it and caused myself all kinds of dramas...
-
Simply because it doesn't sit entirely flush with the bootlid and needs to be pressed down (or pulled from underneath, hence the screw) REALLY firmly to get it to do so. I couldn't think of a suitable way of inducing that pressure for long enough (and consistently enough) to allow the Tiger Seal to cure but not damage the bootlid and / or the spoiler (ironically...), so I took the advice given to me and drilled the hole. It would have gone fine if I'd just remembered that extra 'slotting' step... But yeah, a carbon hatch has just moved further up the priority list...
-
Thanks Jamesy. Shame I kinda ruined her...
-
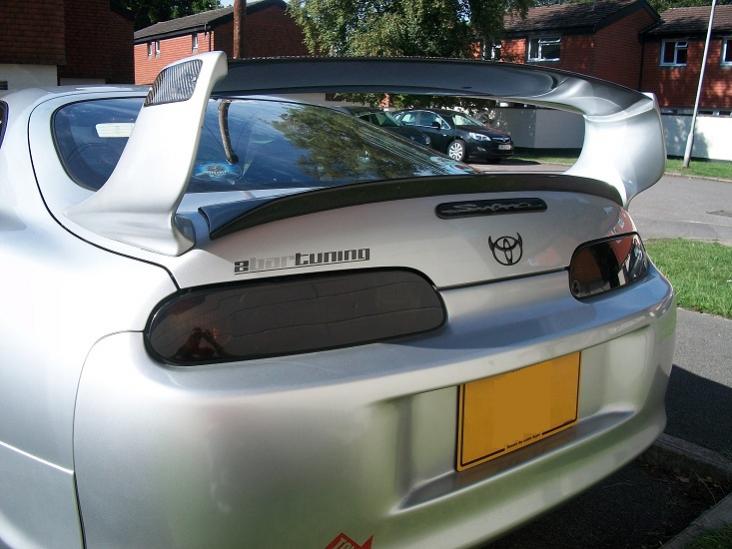
Continued... This is where things REALLY went wrong. When I planned this process in my head, I had intended to create a vertical slot rather than a simple hole in the boot lid to allow me a bit of flexibility range-of-motion-wise. It is after all extremely difficult, despite all the measuring, to GUARANTEE the hole I placed in the boot lid is precisely where I needed it to be. Unfortunately, as you can see from the picture, I kind of forgot this stage. Consequently, when I came to put the spoiler in place and tighten up the self tapper, I noticed that I did indeed need just a small amount of movement from where the screw was going into the spoiler. This wasn't too much of a problem, I thought, even though the Tiger Seal was now starting to do its thing and the self tapper was pretty much fully home in the spoiler. Very carefully, I unscrewed everything and removed the spoiler. With Tiger Seal now on the boot lid as well, I quickly slotted the hole in the boot lid. Things SHOULD have now proceeded easily, but unfortunately, because I had removed the screw from the (now-widened) hole in the spoiler - the material of which is only 1mm or so thick - it meant the self-tapper wouldn't grip properly. This is necessary because the spoiler doesn't sit entirely flush with the boot lid and needs to be pulled downwards in the centre in order to bond properly. A bit panicked now and with Tiger Seal pretty much EVERYWHERE (it's NOT nice stuff to work with... ), I nevertheless came up with a solution: I drilled an additional 2 slotted holes in the boot lid 20mm either side of the original to allow me to use the same large access hole I'd already drilled and did the same on the spoiler with the guide holes. Unfortunately (yes, it gets worse...), because I'd failed to take into account the fact that the new self tappers would be going into the underside of the spoiler at an angle because I was using the single central access hole, the spacing on the holes in the spoiler were - annoyingly very carefully measured to be - in the wrong place. I realised this as I was tightening everything up and the spoiler began to move to the right (simply because I started tightening the right screw first, although I did them each a little at a time). As a consequence of all of this and because I knew that if I removed everything for a second time I would have the same problem and then have to try to drill yet more holes into the boot lid and the spoiler, which for obvious reasons I didn't want to do, I simply had to press on and fit the spoiler slightly off-centre. As an added insult to injury, as I was removing my socket screwdriver from the underside of the boot lid, the head caught on the side of the hole and pulled off the extension, falling somewhere into the inner skin of the boot lid. No amount of fishing around with a magnet yielded any results so, basically, it's still in there... I haven't got any pictures of the work in progress because, funnily enough, doing so didn't really occur to me due to the "think fast, try to save it..." nature of it all. I used the Tiger Seal to put a bead around the edge of the spoiler, which has improved things slightly fitment-wise (it looks flush, which it didn't before because of the off-centre-ness), but it doesn't take the most observant individual around to notice that it's around 7-8mm off : I guess from a distance it doesn't look too bad (damage to the boot lid between the spoiler and rear windscreen notwithstanding), but I'm guessing anyone following me from now on will twig that something doesn't look right. Basically, I'm gutted. I spent a not insubstantial amount of money on a part that I only decided I sort of wanted for something a bit different and then an entire day's work ruining my car. Sucks... :(:(:(
-
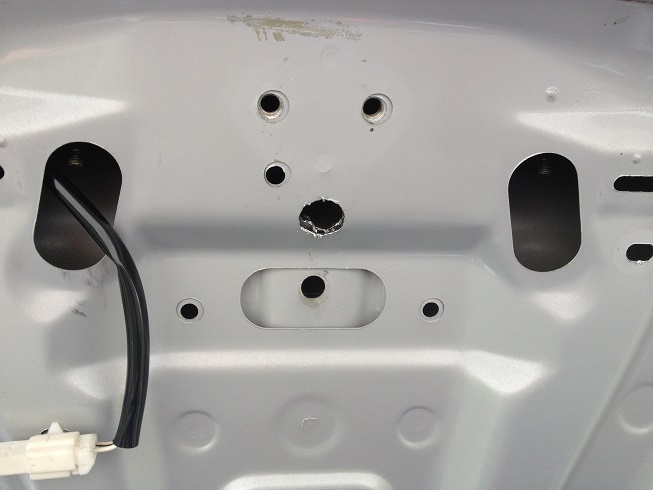
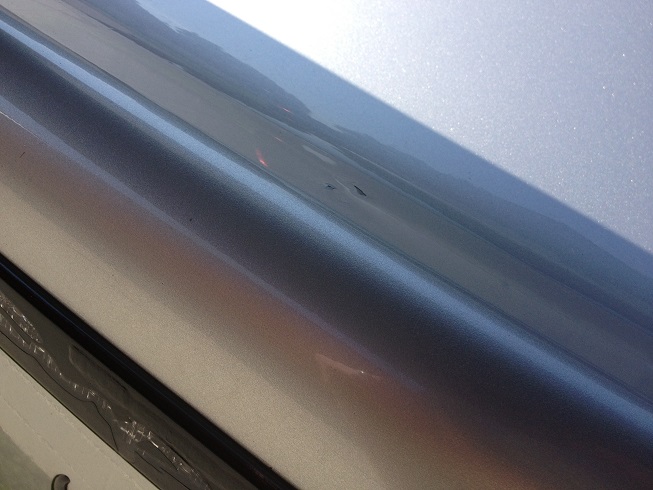
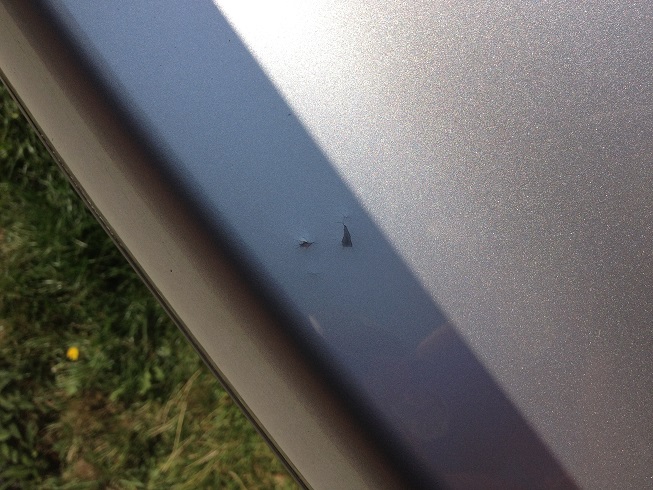
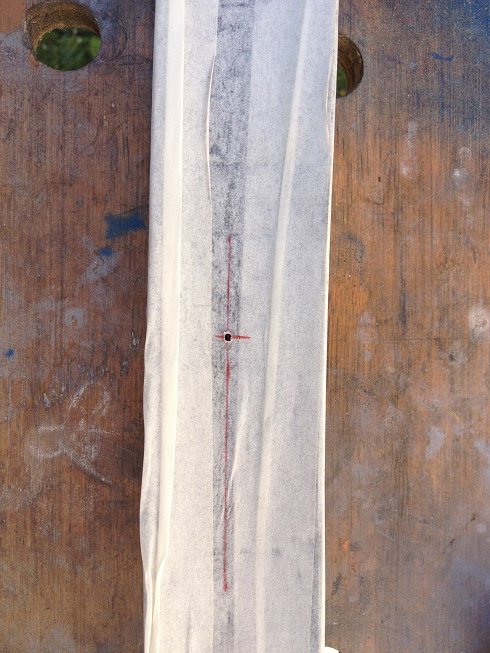
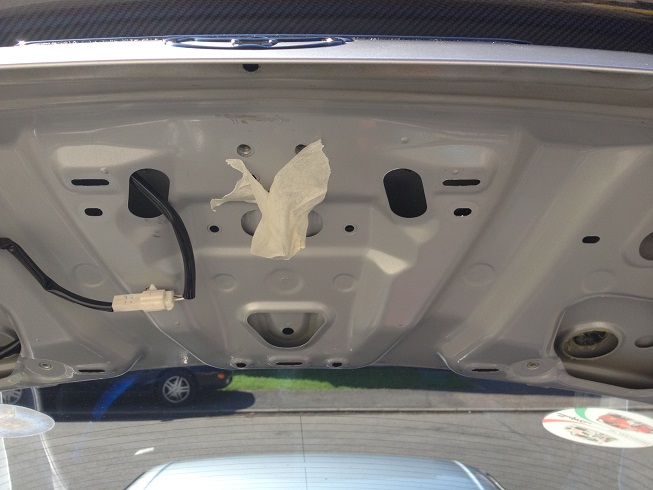
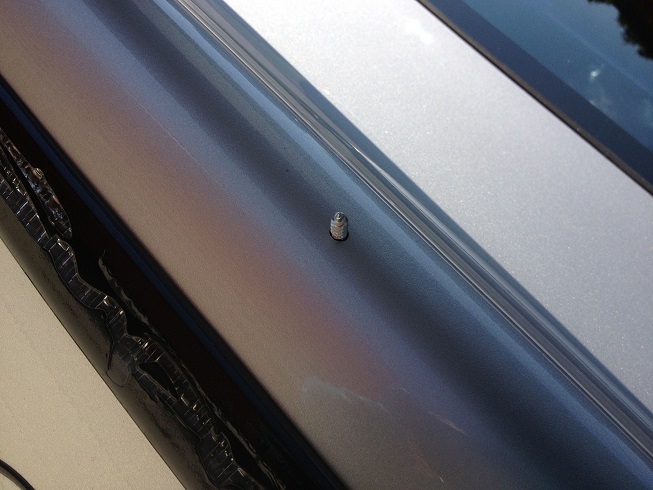
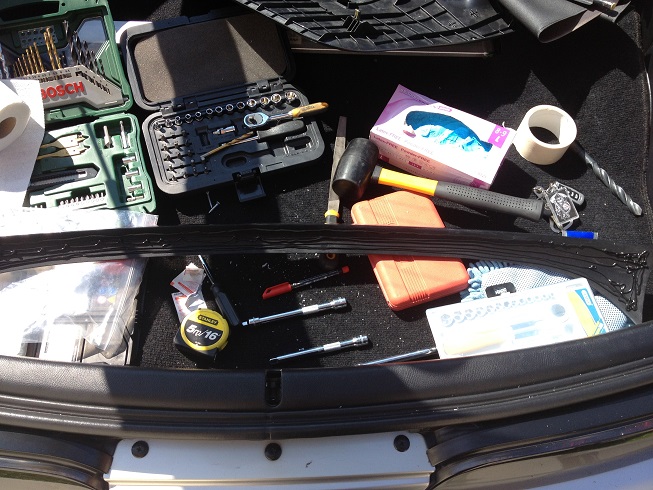
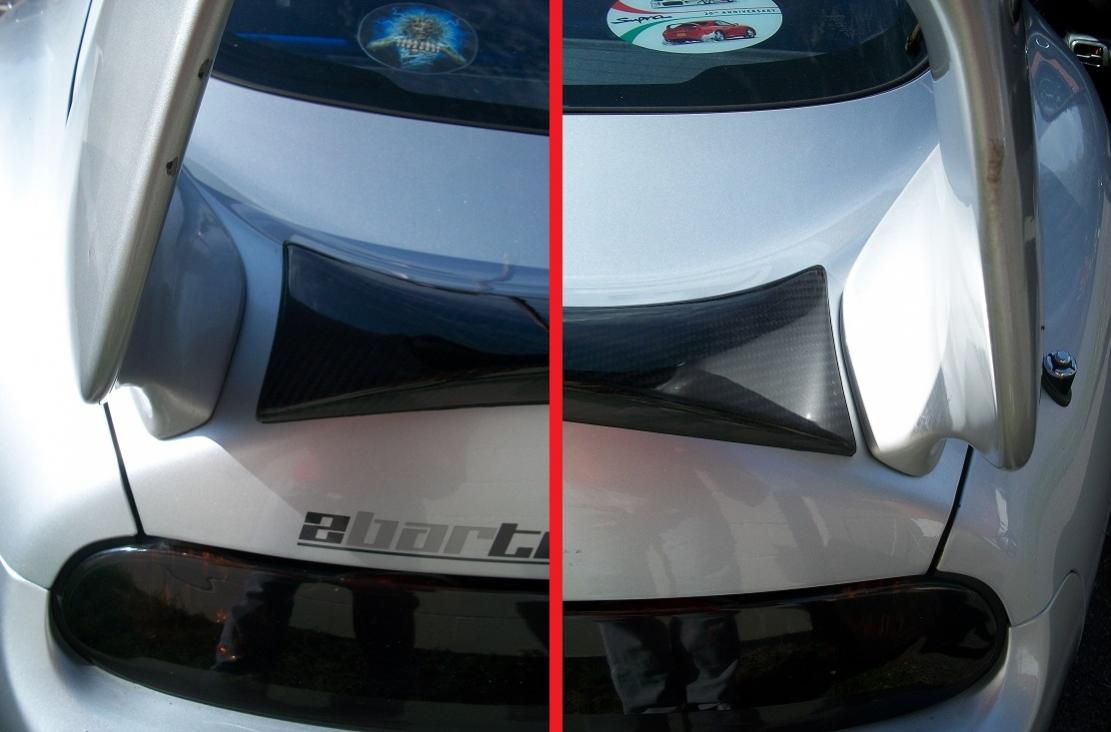
As I mentioned in my previous post, while I was at Whifbitz having my cam belt issue resolved (yes, and more shiny things fitted...!) I opted to buy a carbon Ridox-style boot lid lip spoiler. The next day, I set about fitting it. Sadly, this is about to turn into a bit of a tale of woe... Expect a lot of these: It all started well. I got everything measured up ready for the necessary single hole in the boot lid to be drilled and got the boot trim / locking mechanism disassembled painlessly and set about drilling a 16mm access hole in the inner skin to allow me to get a tool onto the base of said screw. This led to mistake number one... While I was drilling this hole (no different to the ones I drilled in my bonnet a few weeks ago to fit my bonnet pins, of course), the drill bit caught on the metal and was pulled upwards. I released the 'trigger' as soon as I felt the tug, but a fraction of a second too late and the tip of the drill bit hit the underside of the boot outer skin, putting a minor dent in the metal and also chipping the paint. Because of the angle at which I was drilling the damage isn't in an area that gets covered by the spoiler either... Access hole (pre-clean up, obviously): Damage: Clearly I'll have to get a chip repair company on the case as I fear anything I try to do will only make it worse... I pressed on. Maybe this was mistake number two? Anyway... I VERY carefully measured and checked the dead centre of the boot lid and the spoiler and offered the parts up to check it all looked right, which it did. Boot lid marked up: Spoiler marked up and 2mm guide hole drilled: I also successfully drilled the 5mm screw hole in the boot lid for the self-tapper: And came up with an ingenious way of holding the tool / screw in place while I got the spoiler ready with a generous helping of Tiger Seal adhesive: Spoiler / Tiger Seal (ignore the mess... ): TBC


-
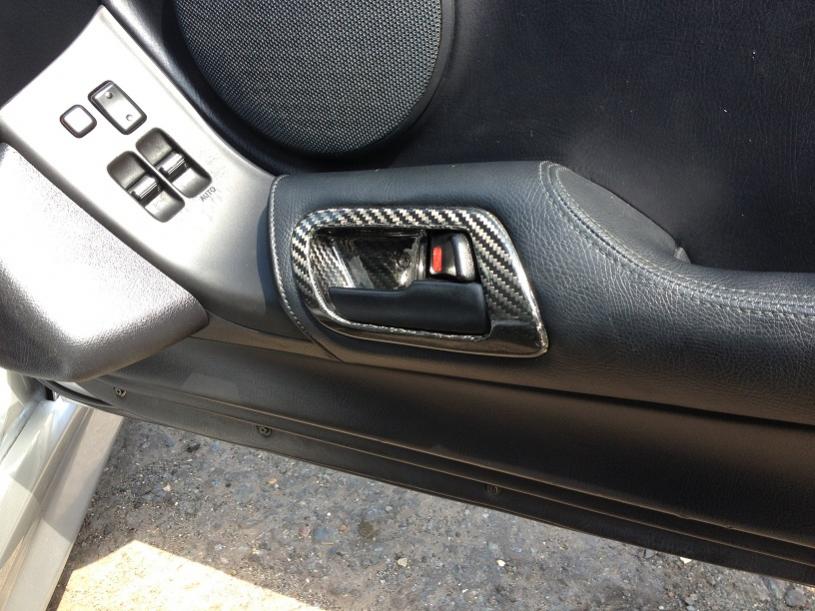
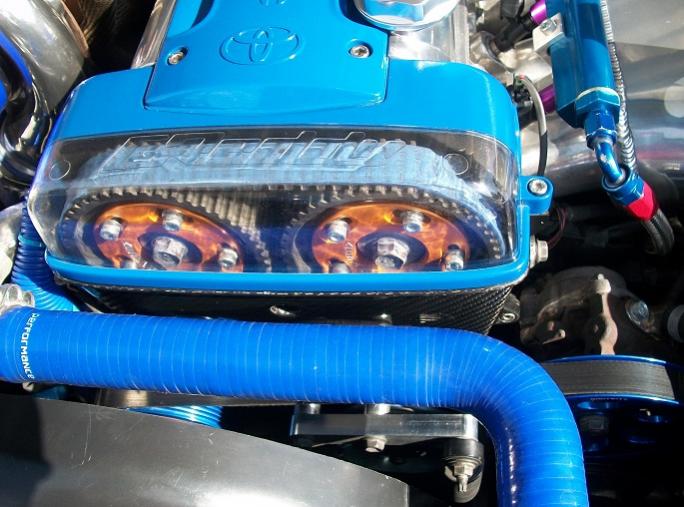
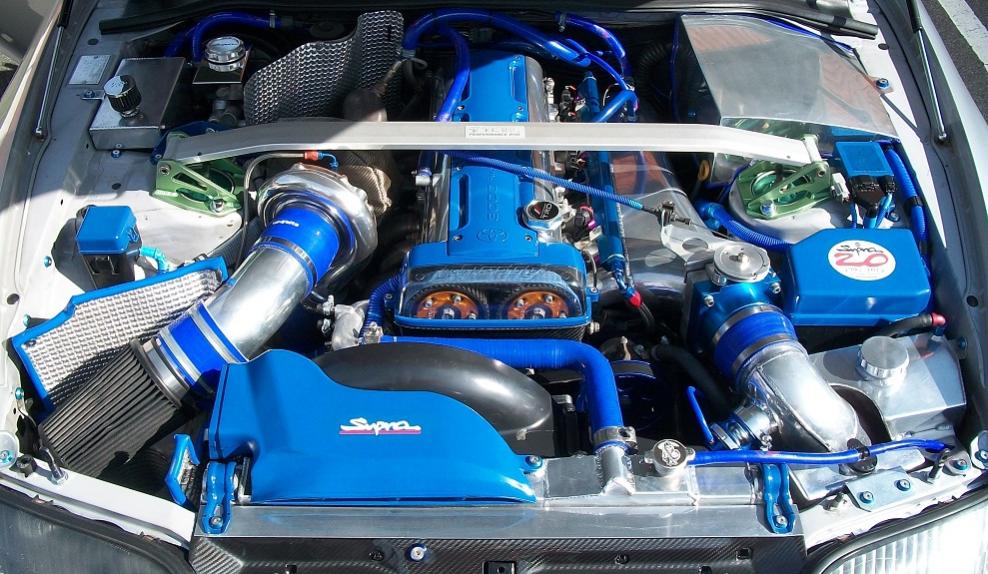
I can't believe it's been more than a month since my last update, so here goes... After it was pointed out to me at the 20th Anniversary shindig by TheTurtleshead (big thanks again matey! ) that my cam belt was running such that it sat over the forward edge of the cam pulleys, I had a chat to Mr Whiffin and booked my car in for the next day to get diagnosed / fixed. The advantages of running a clear cam pulley cover right there - not only does it look cool it means you can spot potential engine-wrecking problems! As an aside, later that day DavidP broke out the most comprehensive tool kit ever to be kept in the back of a Supra - - and checked all of the obvious and easily accesible bolts for tightness, finding that all was well. The problem turned out to be that the (still stock and therefore 18 year old...) bearing on the cam belt tensioner had given up the fight and started to crumble. Darren at Whifbitz very quickly resolved the problem - that man REALLY works fast on a Supra! - and then, since the front of the engine was off anyway, I got him to fit a nice shiny billet auxilliary belt tensioner (to complement my alloy aux' belt pulleys... ) and a carbon lower cam pulley cover. Before the dressing went on, I spec'd a Whifbitz 72-degree thermostat as well. Carbon lower cam pulley cover and billet aux' belt tensioner (also my cam belt sitting correctly on the cam pulleys ): And my new and improved engine bay (not the greatest pic because it's REALLY bright outside right now!): The eagle-eyed amongst you may notice that I also (quite some time ago...) replaced the stock boring bolts holding on my horn and SRD engine bay box with blue cup washer'd M8 bolts that match my M6 ones. Much nicer. With the engine reassembled and the cam belt issue thankfully resolved, I asked Darren to have a look at my gearbox, which I thought was leaking a bit of fluid. I had the upper seal replaced last year when I uprated the clutch and gearbox mounts, etc, so was fairly confident it wasn't that. My theory turned out to be right (it had to happen eventually! ) and it was the propshaft seal that was well and truly on the way out. With that replaced and everything cleaned up and bolted back together things are looking much happier and moisture-free around my gearbox. Darren did point out that my engine oil sump is starting to ooze some oil though - hardly surprising as once again it's still the original part, but definitely something I'll need to address at some point in the very near future. Perhaps with a nice built block or something...? With Paul having just had a delivery of all his range of carbon fibre goodness, I couldn't resist buying a set of carbon door handle surrounds and decided to change the look of the back end of my car slightly with a Ridox-style carbon lip spoiler too (more on that later...). I ALWAYS end up spending way more than I planned when I go to Whifbitz for a day! Door handle surrounds: These are one of the best-fitting aftermarket parts I've ever installed, by the way. Usually there's an amount of fettling or tweaking required with carbon parts but these slipped on perfectly first time. Good bit of kit. Lastly, I asked Paul to have a look at my DASH2. It's still not 100%, feature-wise, with the most noticeable problem (other than the screen backlight functioning in a bizarre way) being that my recently replaced intake air temperature sensor wasn't working at all and read a constant 48-degrees. With a laptop hooked up to the Syvecs, the problem was traced to the sensor simply not being plugged in to the ECU at all...! That'll do it. Darren squared away a pin on the end of the wire and plugged everything in as it should be and the problem has gone away. We then altered my overboost warning. It's been bugging me that the warning lights (which are the same final 2 LEDs in the shift light sequence) come on at 1.7bar, which happens relatively often when I'm 'pressing on' and changing gear at WOT. It's now been set to 1.8bar, which I think is much more the point I need to start worrying that something's gone wrong! I asked Paul if he could check my launch control too, which for some bizarre reason has not been working at all since I last got Ryan to tweak the ECU settings. Instead, every time I engaged it, the engine simply stalled. Very strange. Laptop out and with Ryan on the end of a phone, the problem was actually traced to the cal' switch. It turns out that the launch control HAS been working all this time, but the thing that wasn't was the switch to set it. No one could work out why but when I turned the switch the first three positions (high boost and then sequentially lower) worked as they should, but then when I turned the switch to position 4 (low boost), the ECU saw position 5 (lean cruise). From that point on on the switch, everything was read incorrectly, so when I was on 5, it saw 6 (launch), 6 saw 7, etc... Basically, position 4 just didn't exist and was throwing everything out of whack. I hadn't identified this because as it stands my DASH2 isn't correctly displaying the cal' switch settings (something Ryan is working on a software patch for, apparently). Anyway... With a bit of electrical tinkering on the laptop, things are working as they should and I have the full range of ECU adjustability once again. As I was about to leave, there was a worrying 15 minutes where my car simply refused to start (the fuel pump wasn't kicking in at all, despite the immobiliser being disengaged) and the laptop could no longer connect to the Syvecs, but this was eventually traced to a blown fuse in the ignition circuit. Phew, frankly! So... Suki's fighting fit and better than ever and my launch control (which I've had turned down from 4k rpm to 3200 rpm) is ready to start scaring people for no good reason once again! The uprated thermostat has served to make my water temps a consistent 10 to 12-degrees cooler than they were previously, by the way - I wish I'd had one of these fitted before!